The best Sony picture settings – explanation & recommendation

Since each of you has a certain visual perception, the settings of a TV picture are ultimately a question of subjective impression. Therefore, ideal picture settings look a bit different for everyone. Nevertheless, you have a number of options to adjust the display on your Sony TV and optimize it to your taste. This guide supports you with valuable tips on how to proceed and shows which Sony picture settings are really useful.
Note: In the following explanation guide, we will focus on the settings options in the Google TV operating system of the Sony XR 65X90J. Compared with predecessor models, some menu options might have different names. In addition, our picture settings are based on internal test patterns, which you can of course download for free and output to your Sony TV’s screen via laptop, Apple AirPlay or USB stick later. The display quality of your panel directly depends on your positioning to the screen. Therefore, make sure to adjust all picture settings from the same position. Ideally from where you typically sit when using your TV.
Which parameters affect the picture quality of your TV?
- The type of TV panel that will be at the heart of your setup: If you prefer a very bright screen at the expense of contrast, then LCDs are the way to go. If you want a deep black, OLEDs should be your first choice.
- The setting in which your Sony TV is placed: Is the device placed in a room with no or very little daylight or mostly in light-flooded conditions?
- The intended use of the TV: What kind of picture content do you actually want to display on your TV?
- Slight differences between the same models: Each device is specific.
- The viewing angle: The higher the angle, the lower the picture quality.
- Your own viewing preferences: All picture settings are for the birds if you are unsatisfied with them by yourself
What do the various picture modes of Sony look like in detail?
Vivid
In this mode, you can see wonderfully bright and vivid colors. However, high-resolution images look too intense and are therefore rendered quite unrealistically. If you still have a soft spot for bright colors, this is the mode of your choice. We do not recommend this picture preset option.
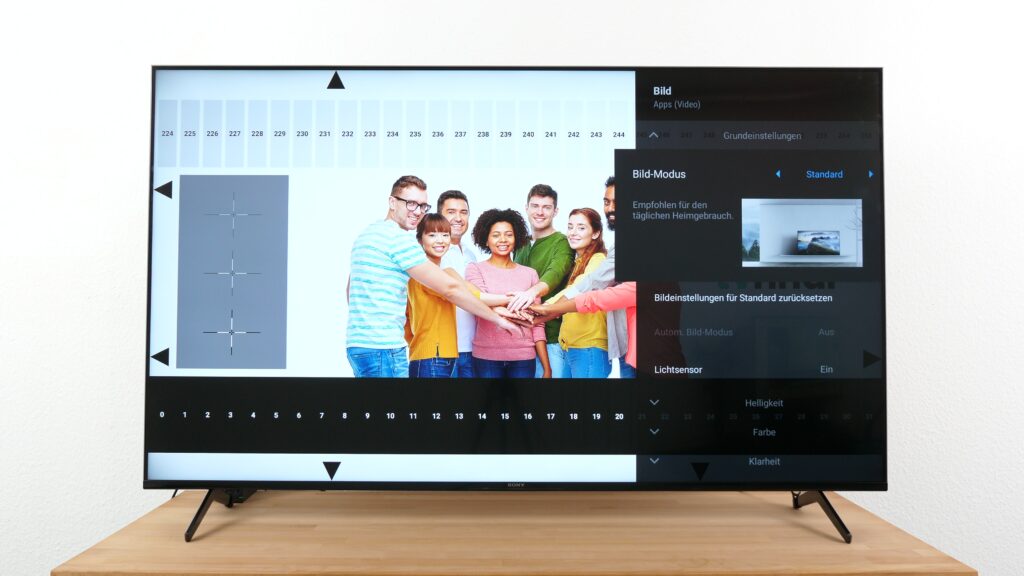
Standard
The default preset of your TV with edge smoothing. No other adjustments are made in this preset.
To get the best picture performance out of your TV, we advise you not to use this option in the Sony picture settings.
Other presets are more suitable at this point.
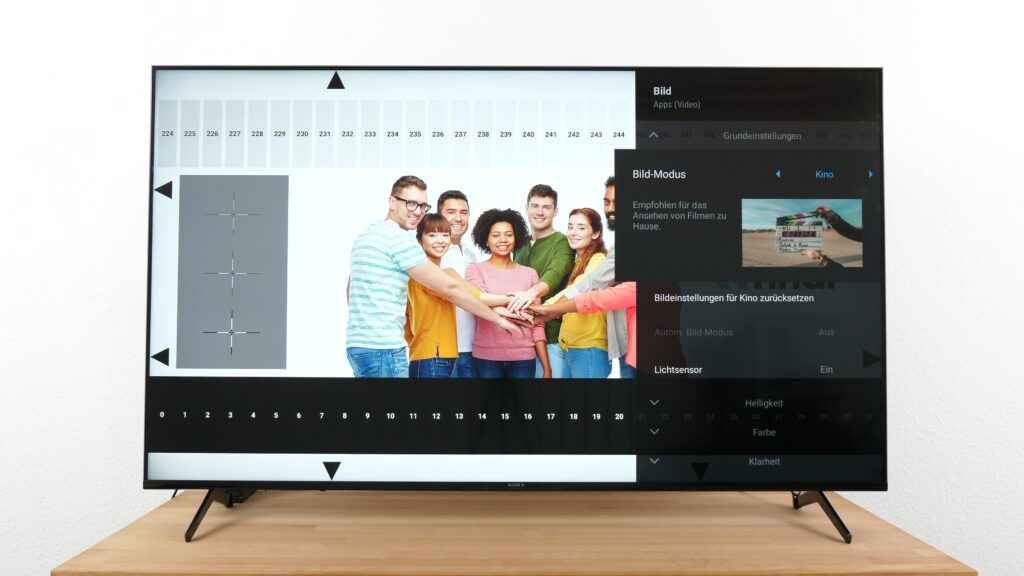
Cinema
You can also consider the Cinema mode as Universal mode. Settings for brightness, contrast, gamma and black level are already quite accurate in this mode.
Sony TVs before 2018 still have two separate cinema modes at this point – Cinema pro and Cinema home.
The former option displays the image slightly darker overall and is suitable for low-light conditions. In opposition, the picture in the Cinema home preset is displayed brighter and is more suitable for illuminated rooms.
IMAX Enhanced
Optimized for viewing movies shot with IMAX cameras. The picture will be clearer and the colors will be brighter and more saturated. It also adjusts the aspect ratio of selected content to the size of your Sony TV. Disturbing black bars are now a thing of the past.
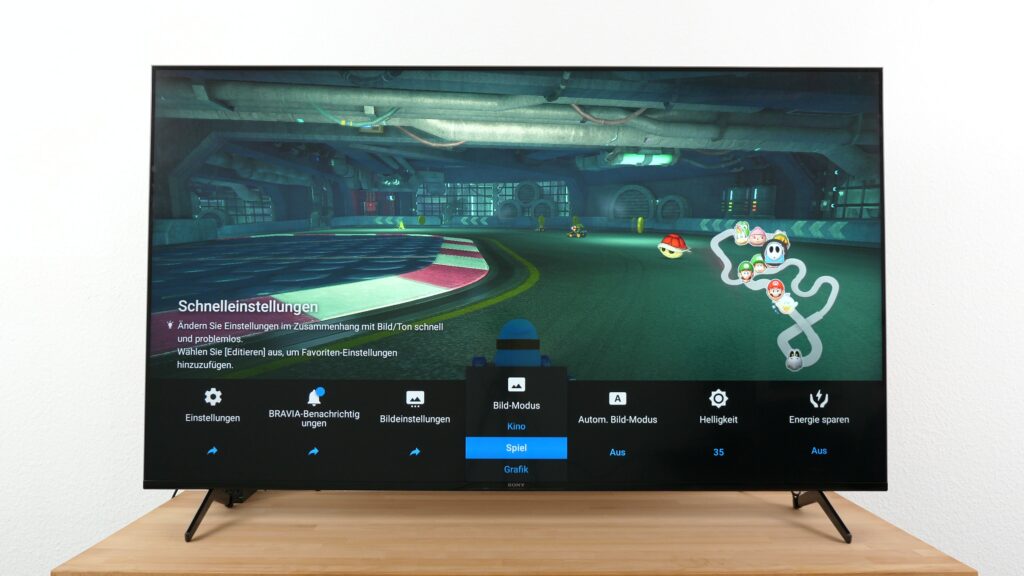
Game
Your Sony TV should automatically switch to game mode when you turn on your console.
Once that happens, you’ll benefit from features like significantly lower input lag, 4K @ 120 Hz, or even improved color representation via Dolby Vision.
Graphic
If you’re wondering what this mode does for you, or in which case you should choose it, the answer is: as soon as you connect your Sony TV to a PC, this is the display mode of your choice. If you still don’t like the picture, you can make further changes to this setting as well.
Photo
As the name suggests, this preset in your Sony picture settings is specifically for displaying your best snapshots. However, be careful when calibrating your Sony TV based on our test pictures, as all settings only apply to the respective preset. For example, if you want to adjust the cinema mode – which we also recommend – you will have to make the settings twice.
Custom
The custom mode allows you to make individual adjustments and save your preferred settings. The output of the original signal is also highlighted.
Dolby Vision bright
This Dolby Vision mode is designed to reproduce the movie producer’s idea of image representation as accurately as possible and is tuned for well-lit rooms.
Dolby Vision dark
As with the bright ambient light preset, this picture mode is meant to bring the producer’s performance onto the panel exactly as intended. The only difference: The configuration is intended for a dark room setting.
Netflix Calibrated Mode
Designed specifically for Netflix original productions, this preset on your Sony TV reproduces the picture quality of the studio production. Netflix Calibrated Mode brings the filmmaker’s vision and creative intent into your home.
What other settings does your Sony TV offer?
Brightness
With this setting, you can easily adjust the so-called luminance or simply the brightness of the panel in the Sony picture settings.
More precisely, you can adjust the backlight of LCDs or the brightness of the individual pixels of OLEDs.
This is the basic setting for your further adjustments and will have effect on all further customization steps.
Contrast
Another important factor for the overall image is the contrast setting. This is where you adjust the brightness between the darkest and brightest areas. Caution: If you select the setting too high, a so-called “clipping effect” can occur. Brightly illuminated image areas can burn out and details can be lost.
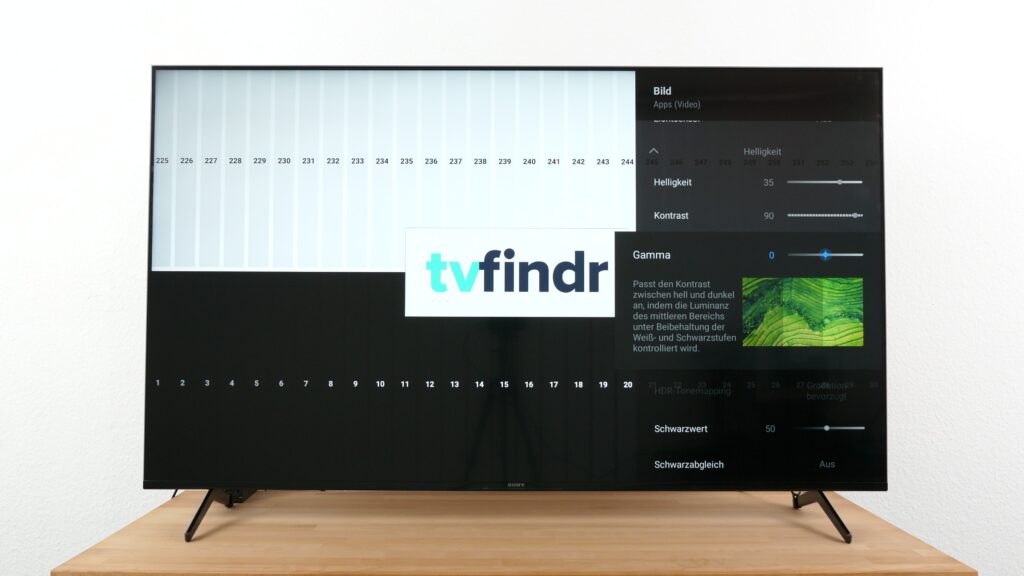
Gamma
In opposite to contrast, the so-called gamma value allows you to adjust the difference between light and dark image areas by regulating the luminance of the middle area while maintaining the white and black levels.
Black level
Mainly adjusts the black level of the image by controlling the signal level. In short, the dark areas on your panel are enhanced to achieve better contrast overall. As a result, this setting brings noticeably more detail in shadowy corners to your Sony TV.
Black balance
Adjusts the black level by analyzing the rendering brightness in real time and automatically adjusting the dark levels. This also improves the appearance of dark areas.
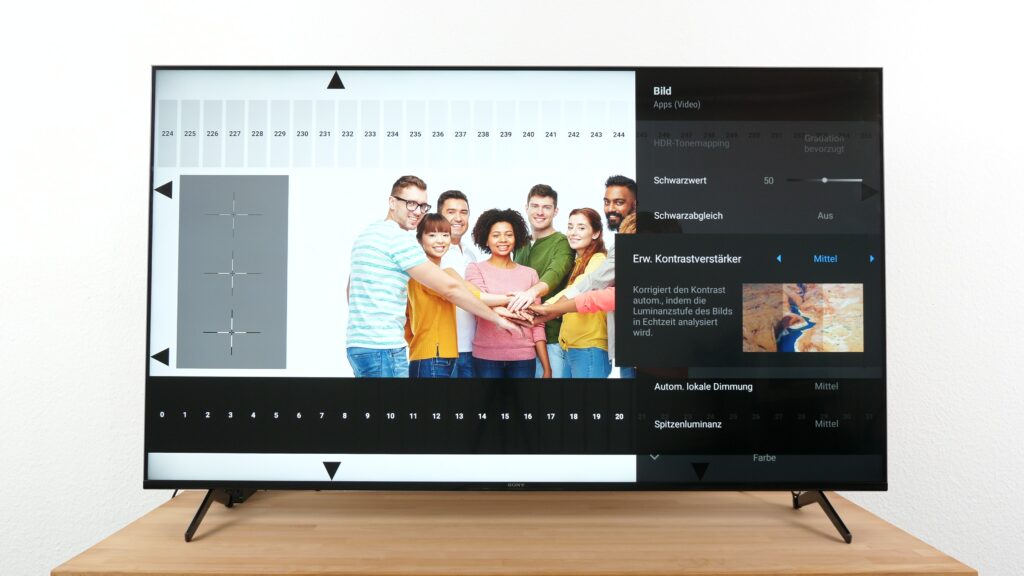
Contrast Booster
As with the black balance, Sony’s so-called contrast enhancer automatically corrects the contrast value.
Depending on the brightness, this option optimally adjusts the contrast.
Objects in the foreground can be perceived better this way, since the image generally looks more spatial.
Color
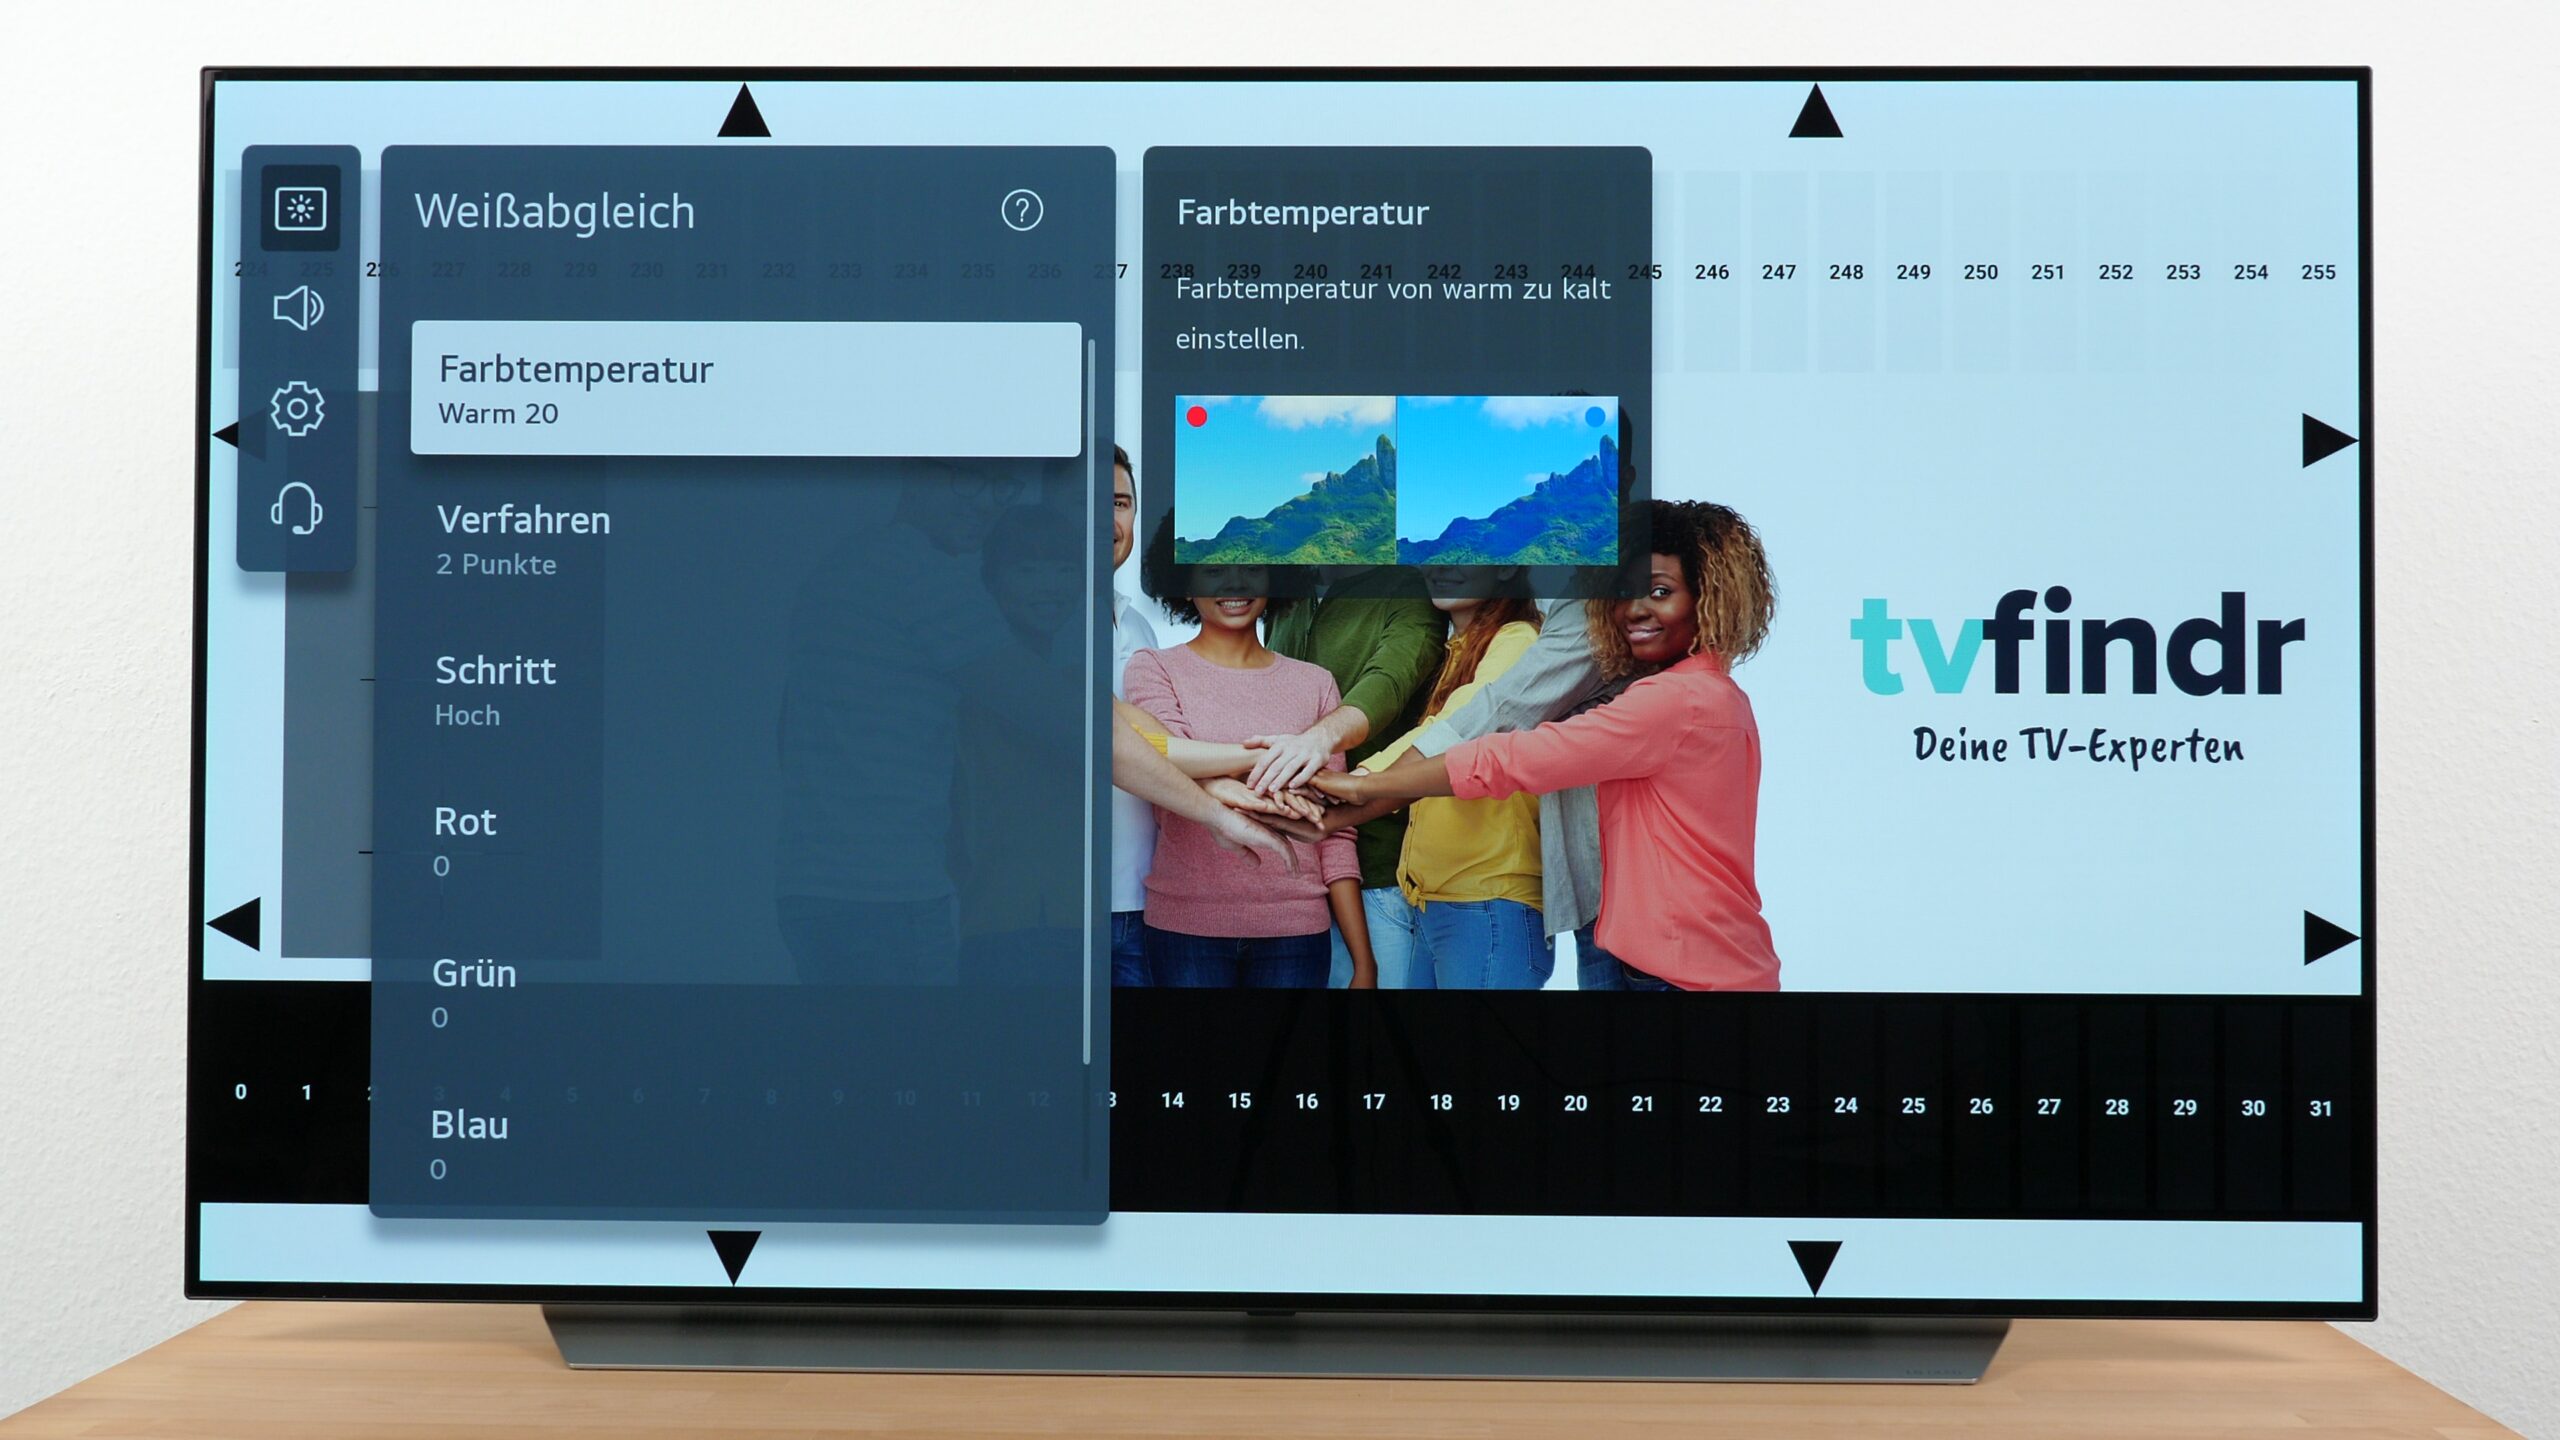
Color temperature
You can use this option in your Sony picture settings to control the amount of white on your TV screen. There are various setting options available for this. The yellow portion in the white increases as you choose a “warmer” color temperature. If you prefer a stronger blue tint, you can make the picture “colder”.

Tint
Use this setting to adjust the tint by letting you control the color saturation of the image as you prefer.
Shifts the color towards red or green.
Mainly you will use this function to adjust the image whose tint has a tendency to color shift during the broadcast. Be aware that small changes have a huge impact on the overall look of the picture.
Vividness
With this value you can adjust the vividness of the colors by correcting the color strength in your Sony picture settings. The result: Colors are displayed much more vividly on your TV.
Clarity
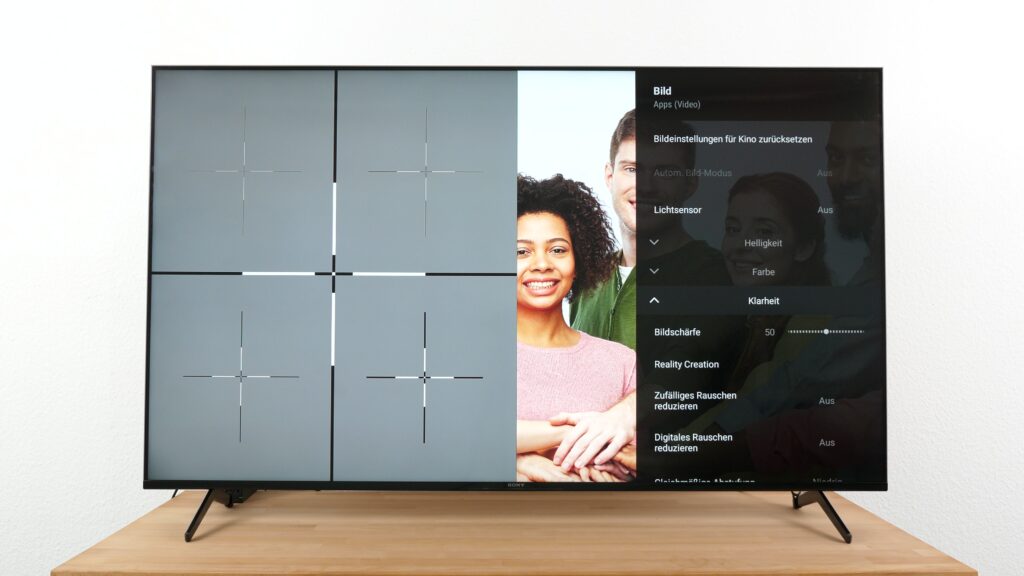
The term clarity might cause irritation for some of you.
Ultimately, it refers to nothing more than the sharpness of the image.
This means that you adjust the sharpness or blurriness of a picture section.
More specifically, edges and details of objects and people in the image are highlighted, making them more visible to the viewer.
If you adjust the sharpness too high, this will have a negative effect on the overall image.
Reduce random noise
With the help of this adjustment in your Sony picture settings, you can reduce the so-called dot and color noise that tends to occur in dark areas of the screen.
Reduce digital noise
In addition, you can reduce noise around letters and compression noise, such as the phenomenon known as block noise. As a result, you will briefly see artifacts as a detached element on the image.
Reality Creation
This feature enhances details by performing high-resolution processing and noise removal while analyzing the image in real time. This in return provides a more realistic visual impression.
Uniform gradation
This option in your Sony picture Settings creates a smooth gradation of color gradients in flat areas of the image by reducing noise and banding in the gradation part of the image. The setting also helps to minimize the well-known banding effect.
Motion

Motionflow
This feature adjusts moving images by increasing the number of frames in order to display the content more smoothly. In this process, your Sony TV implements a lot of self-calculated interlaced images – also called interpolation – into the existing picture material.
You have the selection between the options user, where you can determine the smoothing and clarity yourself as needed, an automatic setting variant and switched off. The disadvantage of this method is the appearance of the so-called soap opera effect.
Movie mode
In this mode, your TV optimizes the picture quality based on different video content using so-called interlaced-progressive conversions and frame interpolation.
Video signal
HDR-Mode
If you activate the HDR mode in your Sony picture settings, content in SDR is artificially improved, meaning it is rendered with a larger color space, also known as gamut.
Color space
The color space determines the range of color reproduction. Usually, simple SDR uses a comparatively low color depth of 8 bits. This corresponds to a color gamut of almost 16.8 million colors. The well-known High Dynamic Range, or HDR for short, has a significant advantage over this.
Advanced color adjustment
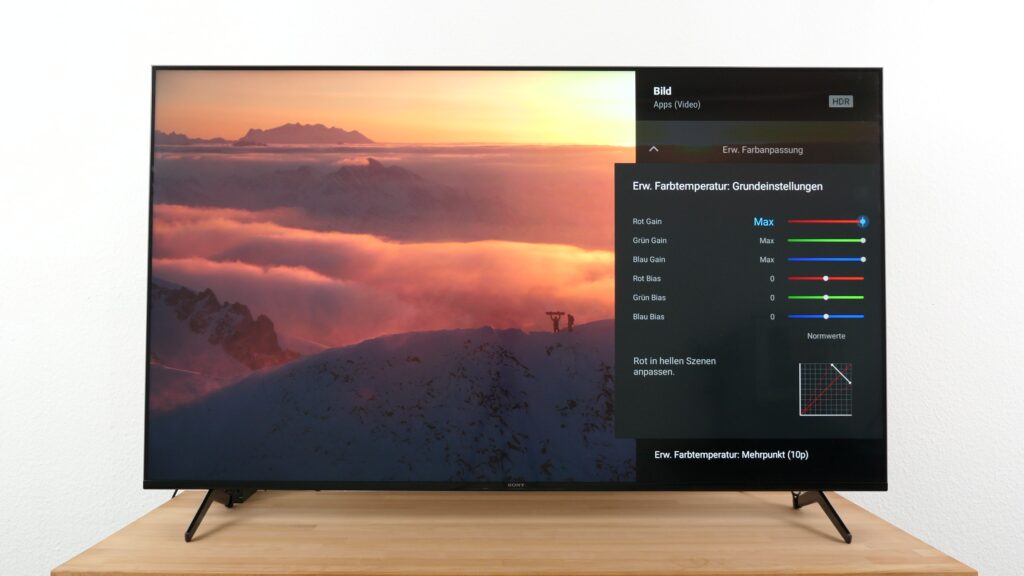
Advanced color temperature basic settings
This function within the Sony picture settings allows you to adjust the colors red, green and blue independently in both bright and dark scenes.
Advanced color temperature multipoint
This setting is intended for advanced users and requires a certified ISF expert with professional calibration equipment. There are 10 setting options available for editing the pixel control on 10 input signal levels. You can adjust the tint, saturation and brightness on a per color basis.

Light sensor
The light sensor in the Sony picture settings allows you to regulate the brightness in relation to the ambient light in your setup. Your TV behaves proportionally to the illumination of the room.
The higher this is, the brighter the panel becomes and vice versa. Note: With this setting, the power consumption may increase more than with the normal configuration.
Automatic tone curve
With this option, you can have the TV automatically adjust the balance between light and dark in the picture. The purpose behind this: Dark areas of the screen should be easier for you to see even in a bright room.
Automatic Local Dimming
With automatic local dimming, Sony gives you a function that lets your TV analyze the contrast of the brightness levels in real time and adjust the intensity of the lighting in every part of the panel for you. Our test device has a total of 32 light zones. In this chapter, we will explain what Local Dimming means exactly.
Peak luminance
Especially in dark scenes, this setting helps you to improve the contrast in real time. The brightness value is analyzed in real time and bright image areas are brightened further if necessary.
Here’s how: Guide to the best Sony picture settings
Let’s now move away from the numerous terms and turn to the actual setting procedure with everything that belongs to it. From now on, we will go through the – in our opinion – most important parameters with regard to a good calibration of your Sony TV.
If you are not satisfied with a recommendation, do not hesitate to vary the individual values back and forth until you are satisfied with the result. To a certain degree, you can also apply the following settings to your Sony OLED TV.

However, keep in mind that the contrast of OLEDs has a completely different quality. Of course, local dimming does not play a role in OLED TVs. As already mentioned, we use internal test patterns for calibration, which you can download from us for free.
Also, make sure that you make your adjustments in the Sony picture settings in lighting conditions where you will be actively using your TV most of the time. And as always, the same applies now: The perfect picture depends on each individual’s visual perception and personal preferences.
This is how you proceed in the Sony picture settings
Before you start your way through the calibration jungle of your Sony picture settings, you should make sure that you have reset your TV to the factory settings. Once you’ve done that, you’re ready to go. The gear icon on your remote will take you to your TV’s menu. You can already see some presets at this point. However, this is by far not the entire settings palette.
First, you navigate to the picture settings and change the picture mode. Although the standard mode of the Sony is already quite good, we change the preset to Cinema. As soon as you have done that, you should notice that the color temperature is now a bit “warmer”. This effect can be seen well in the slightly yellowish overall impression of the picture. In addition, the color representation in this preset is more accurate than in the standard setting.
The main reason for this is the reduced proportion of blue in the picture. This makes the picture look more natural, especially on LED TVs, which often tend to have a high proportion of blue. You can already get a lot of additional picture quality out of your Sony TV with this setting. Logically, this option is not enough for us in the Sony picture settings.
If you use your Sony TV at different times of the day, the brightness of the environment will change at some point. For example, if you have calibrated the TV in comparatively dark light conditions, the picture might look too dim during the day when there is a lot of light. The built-in light sensor provides a solution to this problem. We therefore recommend enabling this option so that the TV dynamically adjusts the brightness to the ambient light while watching.
Sony picture settings and the adjustment of brightness
By switching to the picture mode Cinema, brightness, contrast, gamma and black level have already been preconfigured and satisfy us. We will go into more detail about these settings on the basis of our test pictures. First, however, we will take a look at some other features. We are talking about Auto Local Dimming, known as FALD for short, and the Peak Brightness menu option. Both entries can be found a bit further down in the Brightness tab.
We recommend leaving FALD on the medium setting so that the function does not interfere too much with the brightness of the panel and thus promotes the blooming effect too much. We explain what exactly the blooming effect on TV screens actually is and how this fuzzy look is created.
Depending on the image content, you might also want to use the low setting. In addition to calibrating the automatic zone brightness, you can make the image brighter overall by adjusting the so-called peak brightness. Since we optimize the display for SDR content at this point, we advise you to take the midway path with this setting as well. This way, you can see highlights a bit more clearly.
Adjust contrast and brightness in detail
Once you have passed these menu items, we will now start to further optimize the TV picture. For this, we will once again examine the brightness and contrast values in your Sony picture settings – but this time in more detail.
Note: If you want to use our test pictures on your Sony TV, your TV will automatically jump into photo mode. Make sure that you exit this function before you make any further settings. Also, make sure to switch back to Cinema mode afterwards. Otherwise, all your changes will not be applied by the system.
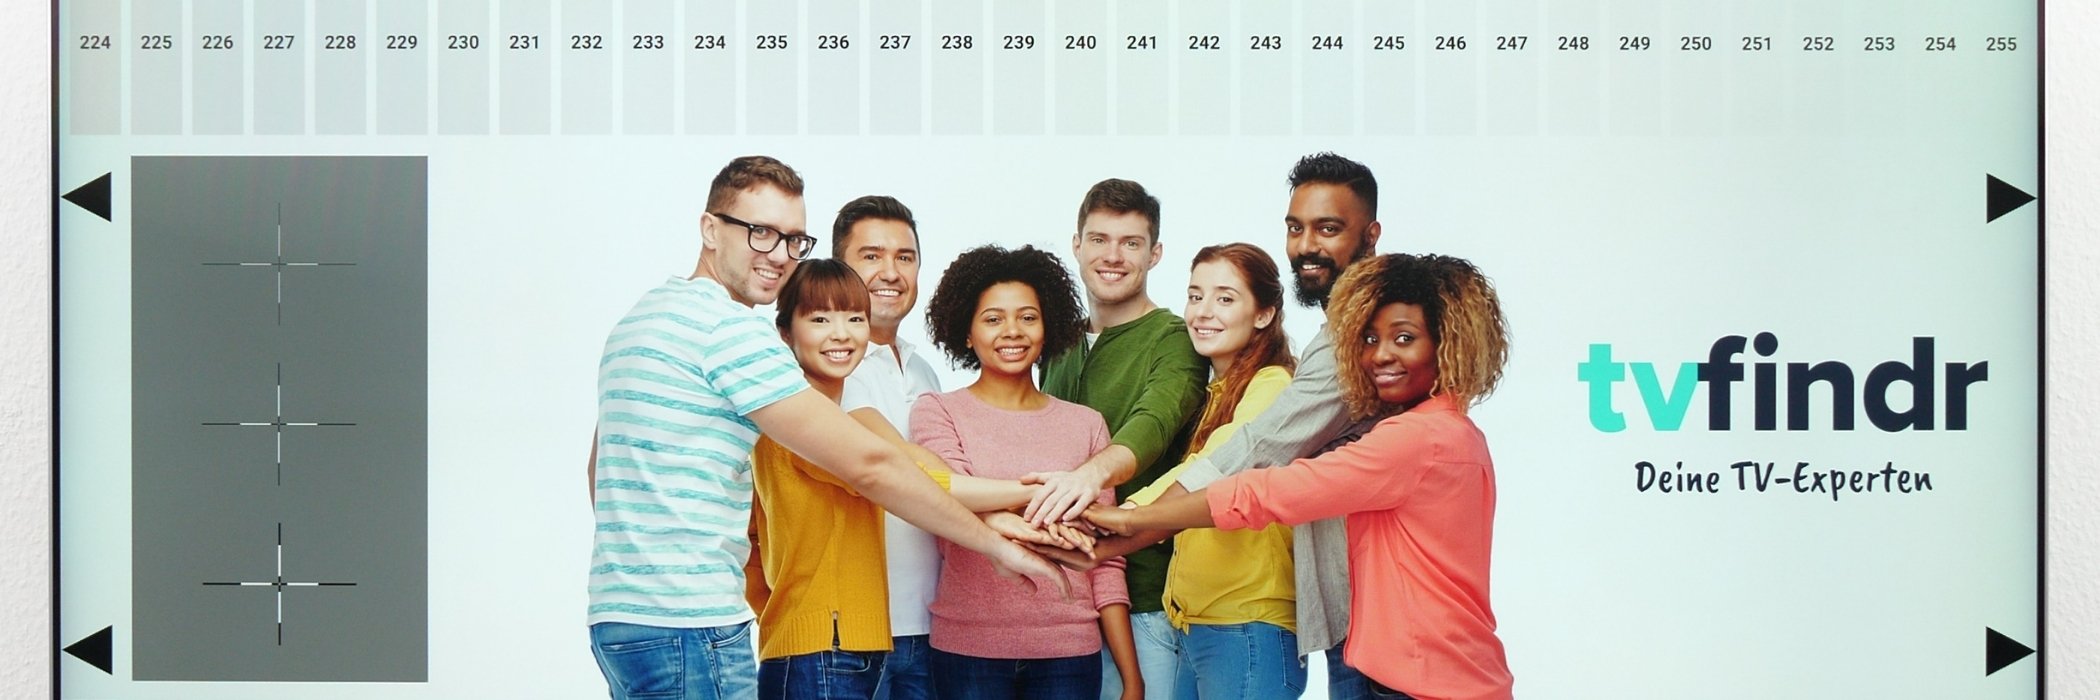
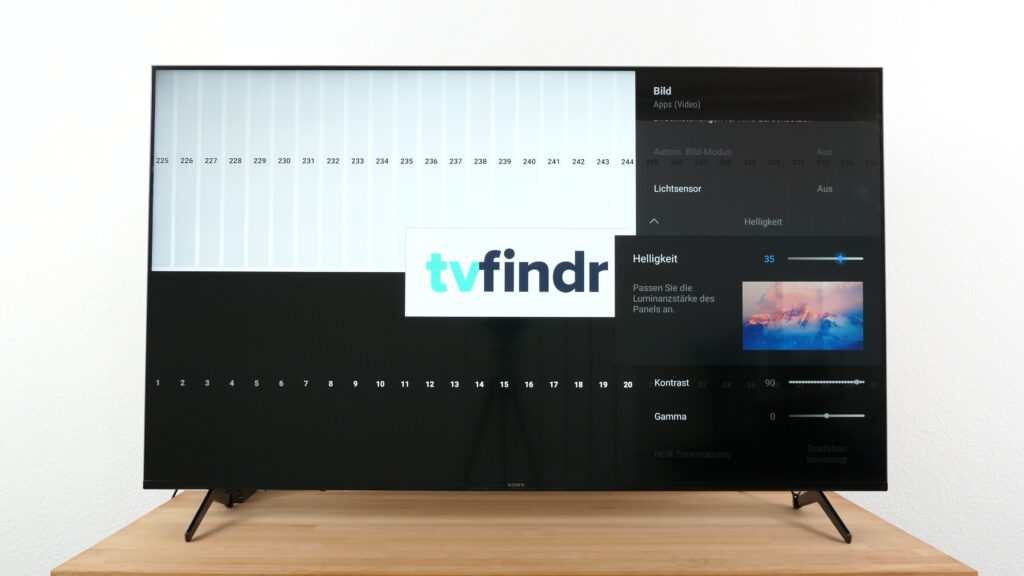
Basically, you should make sure that you can see as many brightness gradations as possible when calibrating the contrast. For example, if you go to a value of 80, the area with the 253 on our test device is still well visible on our test image for calibrating contrast and brightness. Nevertheless, the lower black levels are still supplied with sufficient darkness.
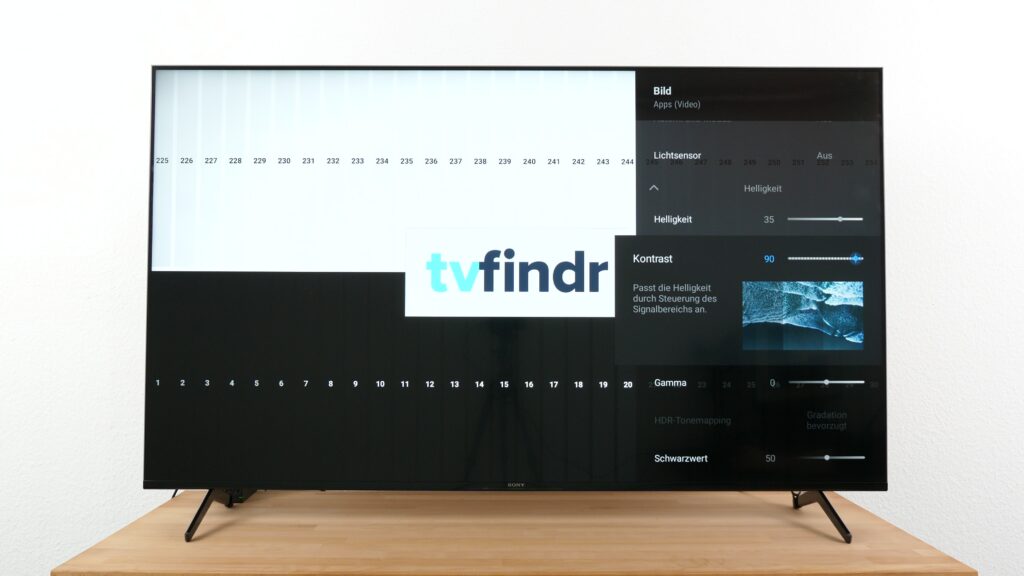
When it comes to brightness, the most important thing in the Sony picture settings is to recognize all the gradations on our test image well. This time, however, you will not focus on the upper, bright area, but rather on the lower region. Concentrate on being able to clearly distinguish between all the levels.
If this is not the case, try out the settings. As a guideline, we will give you the value of 38 at this point. On the panel of our test device, we could still distinguish every single stripe well and still had the impression that the very first level still has a relatively dark black. Here is another tip: Please do not mix up the screen brightness setting with the brightness of the backlight.
Beyond the already mentioned setting options, the extensive menu structure of the Sony picture settings offers a few more options for brightness optimization. First of all, there are the two menu items for the black value and the black balance.
Since the first one interferes with the contrast value you have already set, you leave this entry aside and do not change anything. Adjusting the black values does not really improve the picture quality in our opinion. So you can leave this setting at the factory settings as well.
The same applies to the contrast booster. We don’t think that this option is a good choice for you, since the overall picture makes a more natural impression on us if the contrast remains static and is not dynamically changed by your Sony TV.
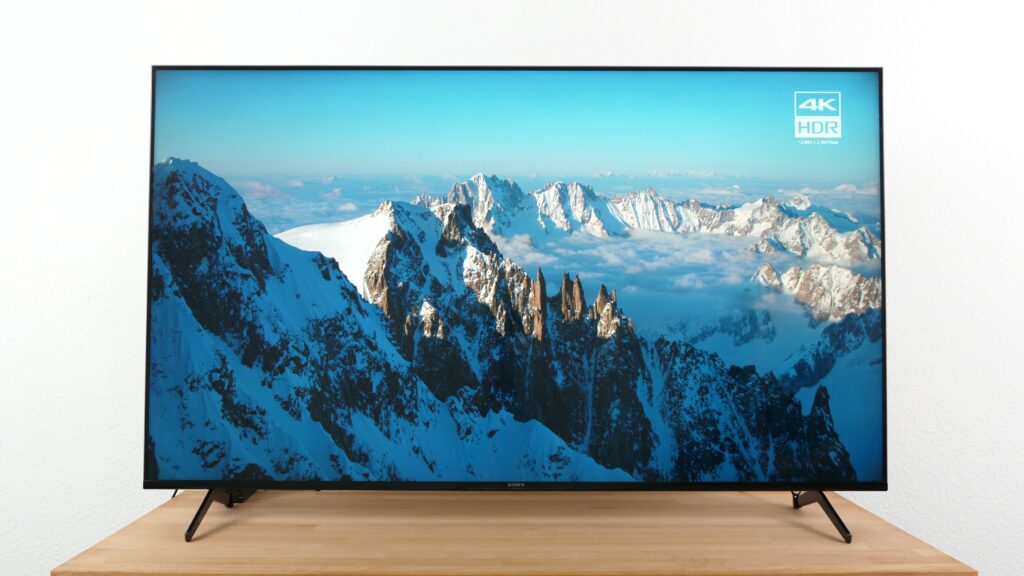
Although the values for contrast, brightness and gamma have already been changed by the Cinema mode, bright scenes look a bit better if you lower the gamma value to minus one in the picture settings. The best way to do this is to use our test image with the snowy landscape.
The color optimization of your Sony picture settings
In the next step we follow the menu to the color settings. Often, minor changes in this area are all that is needed. For the most part, however, you don’t have to change anything in this section. That makes things relatively easy for you, since you should be careful with the color settings.
One advantage that we immediately use is the preset available in Cinema mode. There, the picture is already calibrated with a manageable proportion of blue. This means that the color temperature is already well suited for many movies and series. However, you can still reduce the blue color ratio further via the Expert 1 setting if you want to.

Of course, you can also adjust the color saturation and tint to your liking in this menu. If you are not a fan of strong colors, you can turn down the saturation a bit. Conversely, more saturation also means more vivid colors and a more colorful overall picture.
We advise you to keep the default setting. The same applies to the color tone setting. Even a deviation of a few values is enough for the image to lose its naturalness.
Finally, you can achieve more vividness in color reproduction via color brilliance. As with color saturation, saturated colors are up to your own preference. If you are in doubt, you can toggle through the options here as well. However, we do not recommend making big changes in this area either.
Provide more clarity – This is how it works
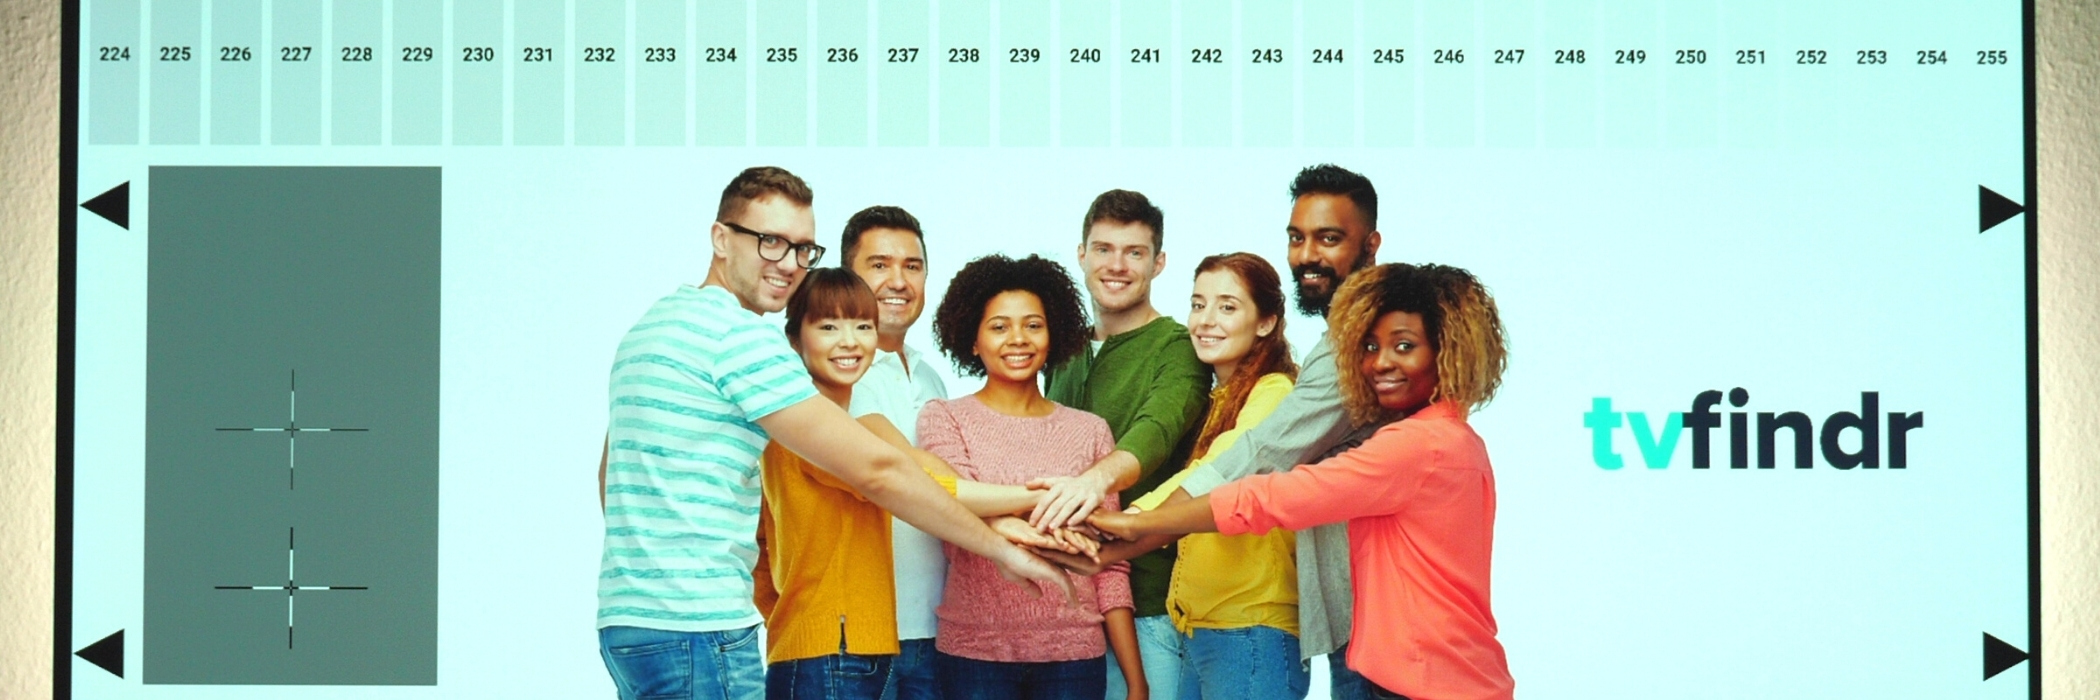
As mentioned earlier, the clarity of a screen is equivalent to the sharpness level. Before you start the adjustment, take our test image with the four gray crosses inside the four gray squares. To adjust this parameter properly, keep a close eye on the crosses. The most important thing for you is to avoid so-called double contours around edges.
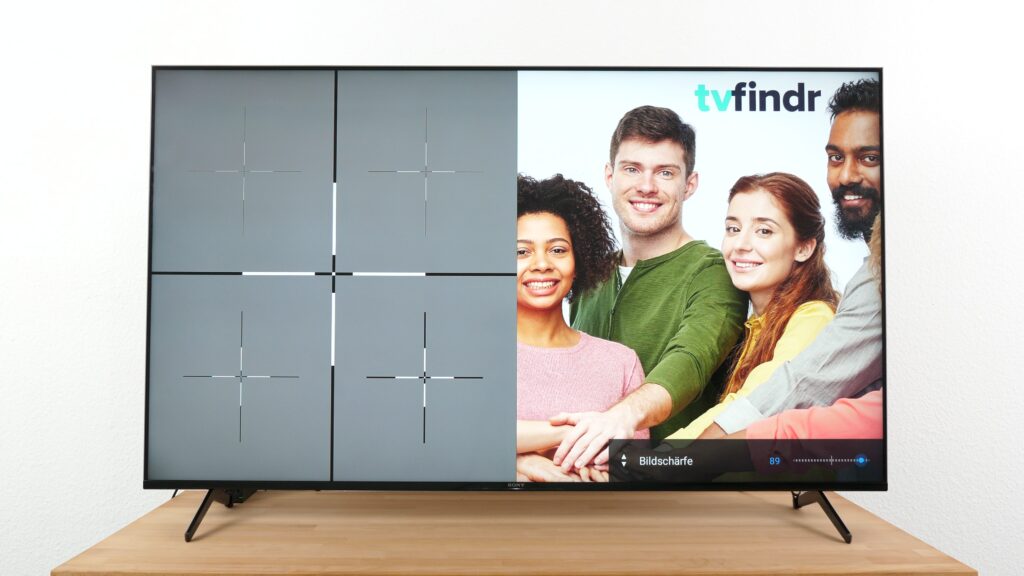
In addition to the graphic, you can also see a group of people that we have deliberately integrated into the image. The idea is that you should also be able to base your settings on a real photo. Calibrating the display only on the basis of a prefabricated display graphic is only half the battle, so to speak.
Focuses especially on the hair structure in this picture. Our goal: The individual strands should appear more clearly than before. Of course, the premise applies again for you to pay attention to doubles in the edge gradients.
In order to further optimize the sharpness, Sony provides you with additional tools like the Reality Creation feature. This is an AI-based function for dynamic sharpness improvement. However, we recommend staying with the static setting.
You also have the option of applying two different noise filters to your image. Normally, you can safely skip this option, since noise hardly ever occurs nowadays. To make color gradients softer, you can use the smooth gradation. Typically, you can leave this item at a low level.
What is the best way to adjust the image movement?
In order to achieve smooth motion sequences on your screen, the Sony picture settings also offer a couple of options in their menu structure. The so-called Motionflow immediately kills two birds with one stone.
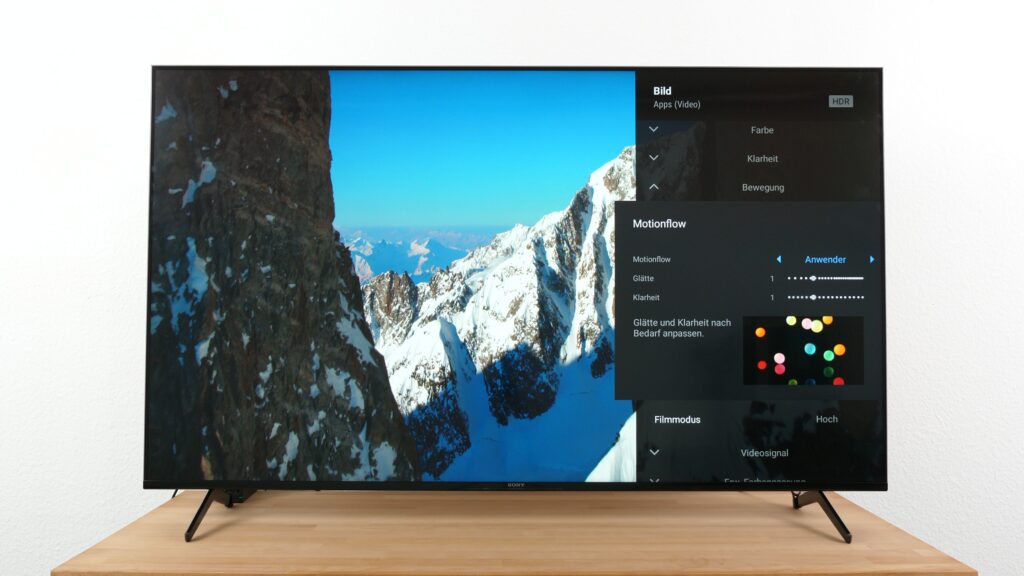
This feature is not only responsible for the calculation of intermediate images, but also takes care of the so-called black frame insertion at the same time. However, you can only set the Black Frame Insertion if you leave the Motionflow on your Sony TV in manual mode.
Sony’s Motionflow feature is of course an enrichment in terms of motion handling. However, a smoother image reproduction can also be problematic for two reasons. First, there is the risk of the unpopular soap opera effect. Secondly, a slick picture can have a negative impact on the dynamics in fast scenes and thus make the picture content look boring.
In addition to the actual Motionflow, you can also find the menu option with the addition Clarity. This stands for the mentioned Black Frame Insertion. This feature avoids motion blur, but it dims the panel as a side effect, since the brightness is reduced at the same time. Therefore, we recommend turning this option off.
You also have access to a movie mode. Set this option to “High”. Doing so will reduce the judder effect on your Sony TV. However, if you notice micro-stutters, it might be necessary to adjust this setting afterwards.
You should pay attention to these gaming settings
Nowadays, TVs are also increasingly used for one or the other gaming session and often are even optimized for this purpose. In order to get the maximum performance out of your Sony TV, we will tell you what you should pay attention to. Our test device, the Sony X90J, already has almost all the features that will make your gamer’s heart beat faster.
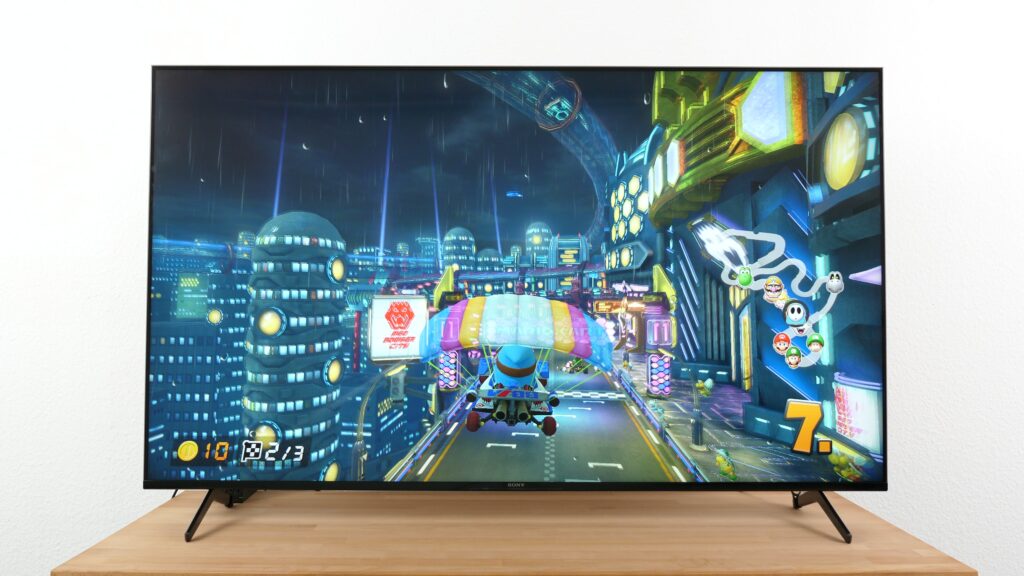
As soon as you turn on the console of your choice, for example the PlayStation 5 or Xbox Series X|S, the panel jumps directly into the game mode. Since this is already preset quite well by default, you only have to optimize it a bit – if at all – with the help of our guide above.
In any case, you should know that you are in for a – let’s say – unpleasant decision. We are talking about Dolby Vision in combination with VRR and 4K @ 120 Hz. If you want to use both together, you will be left out in the cold. The refresh rate is reduced to 60 Hz as soon as you activate Dolby Vision.
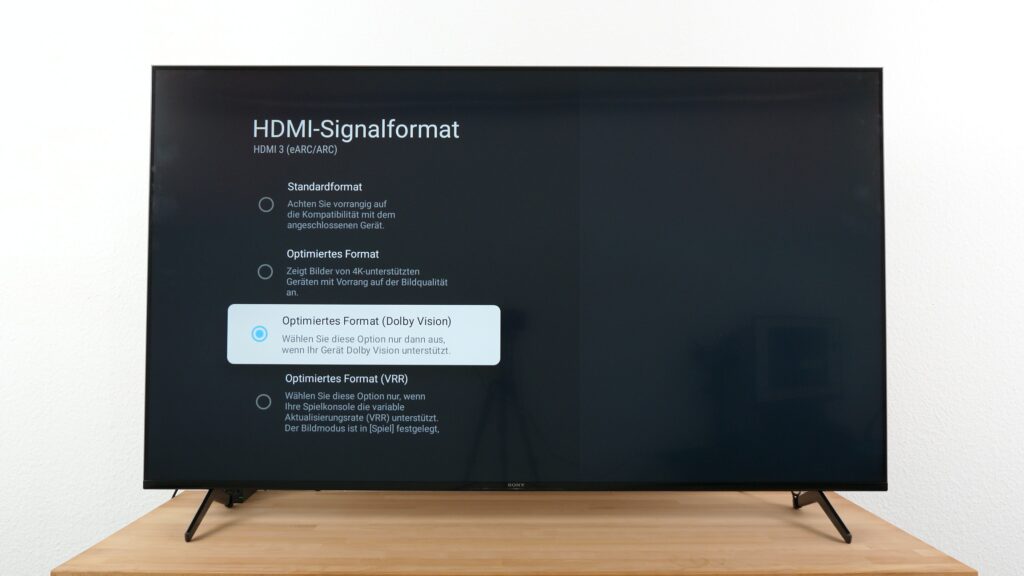
How do you do this? First, press the gear button on your remote control.
Once you are in the settings, you can navigate through the menu items “Channels and Inputs” and “External Inputs”. Finally, select the “HDMI signal formats” with the HDMI 2.1 interface.
The difference between the formats is as follows: You can activate Dolby Vision for gaming with the setting optimized format DV. The optimized VRR format enables an Ultra HD resolution with 120 hertz.
What tricks are waiting for you in the HDR option?
Due to the increased color gamut, the so-called High Dynamic Range or HDR has been an integral part of most TVs for several years now. However, every manufacturer handles this image enhancer differently. The HDR setting of our test device is quite simple. As soon as your Sony TV receives a corresponding signal, the device automatically switches to HDR mode.
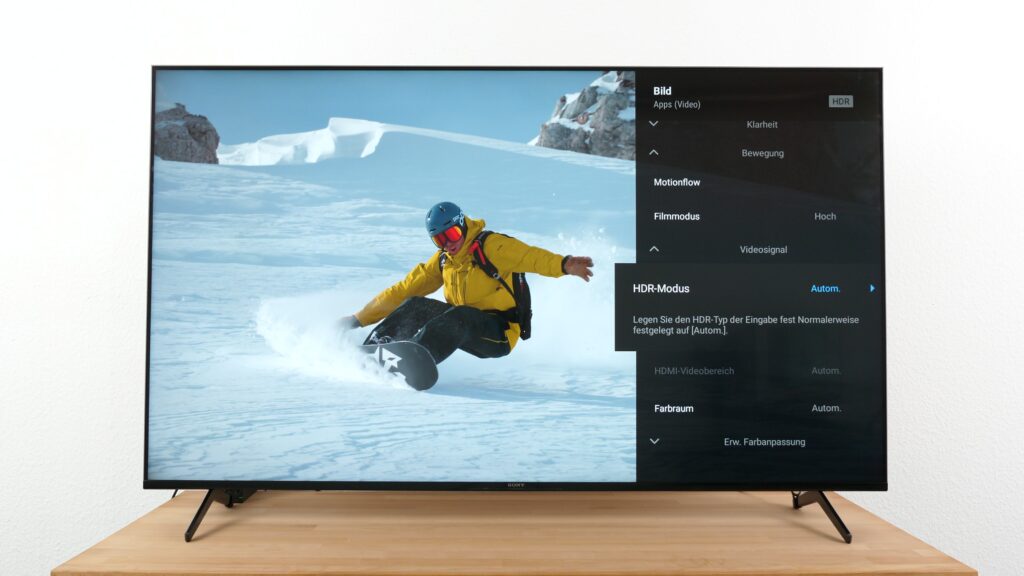
This is also the case for popular streaming services like Netflix and Amazon Prime. Now you can freely play around with the brightness settings. However, we will not do that here. Instead, we simply set the peak brightness to “High”.
The SDR settings remain completely unaffected. If you still have the impression that the playback in SDR suddenly seems unsuitable, you don’t have to be afraid of adjusting the settings afterwards so that the picture matches your preference.
FAQ – Frequently asked questions about Sony picture settings
Which picture mode is best for Sony TVs?
To get the best possible results, you should set your Sony TV to Cinema mode. Older Sony models still differentiate between Cinema Pro for low ambient light and Cinema Home if your room is illuminated quite brightly.
What is the function of Motion Flow on Sony TVs?
Once Motionflow is activated, your Sony TV automatically calculates suitable intermediate images in real time and inserts them simultaneously at the appropriate position in the displayed material. As a result, image blurring is minimized so viewers get a smoother visual impression.
What is the difference between Sony and Sony Bravia?
The term “Bravia” is often used at Sony. This is just the brand name that the Japanese electronics company generally uses to describe its TV models. The word itself is an abbreviation and stands for Best Resolution Audio Visual Integrated Architecture. It is not associated with a specific technical feature.
How does the automatic adjustment of picture and sound work?
The magic word here is “Ambient Optimization“. Your Sony TV uses a light sensor to adjust the picture’s brightness to the prevailing ambient light. Object detection optimizes the sound reproduction and adjusts the sound according to the room environment.

tvfindr Editorial
As a studied technology journalist Tobi likes to write regularly about the colorful world of TV sets & Co. Further interests: Music, cars, gaming, soccer