The best Samsung picture settings – explanation and recommendation

The rule that everything is up to the user is also true for the Samsung picture settings. If you are not satisfied with our adjustments or if you are not sure about one or the other setting, do not hesitate and use the opportunity to vary the values. Often, even small changes are enough to achieve the desired result. We will show you how to do this in detail in the following guide.
Note: The settings in this guide are based on Samsung’s new Smart Hub and the Samsung Neo QLED QN95B’s Tizen 7.0 operating system. Since the layout has changed a lot compared to the previous year, the designation and structure of menu items can differ considerably in some cases. We include our internal test screens for the calibration process. So that you have the same prerequisite for the adjustment, we provide you with these test patterns free of charge as a download. You can display them on the panel of your Samsung TV via laptop, USB stick or Apple AirPlay. All picture settings should be made from your usual sitting position and in comparable lighting conditions.
These factors will affect your Samsung TV
- The technology of your panel: An important point is the technology with which your panel generates the image. Do you have an OLED TV with perfect black and excellent contrast or an LCD TV with a comparatively bright picture reproduction in your living room?
- The lighting conditions at which you usually watch: Is your TV used more during the day or do you watch more often in the evening?
- The intended use: What content do you usually watch? Do you like high-definition movies and series in 4K or do you prefer to watch the latest sports program and your favorite club on the sofa?
- Minimal deviations of identical models: Even TV devices that appear to be identical can have slight differences. Identical settings are therefore not always exactly transferable between the devices.
- The problem with the angle: The problem with the angle: Do you sit frontally to the screen or do you usually look at the panel from an angle?
- Subjective image perception: Just because the person next to you considers the image to be good doesn’t mean you have to do the same. Everyone has their own personal preferences. This also applies to your visual perception of image content.
You can find the following modes in the Samsung picture settings
Dynamic
Contrast and brightness are increased significantly in the dynamic preset. Colors are also visibly richer on your screen. If you want to make the display much more colorful, you are perfectly placed in this mode.
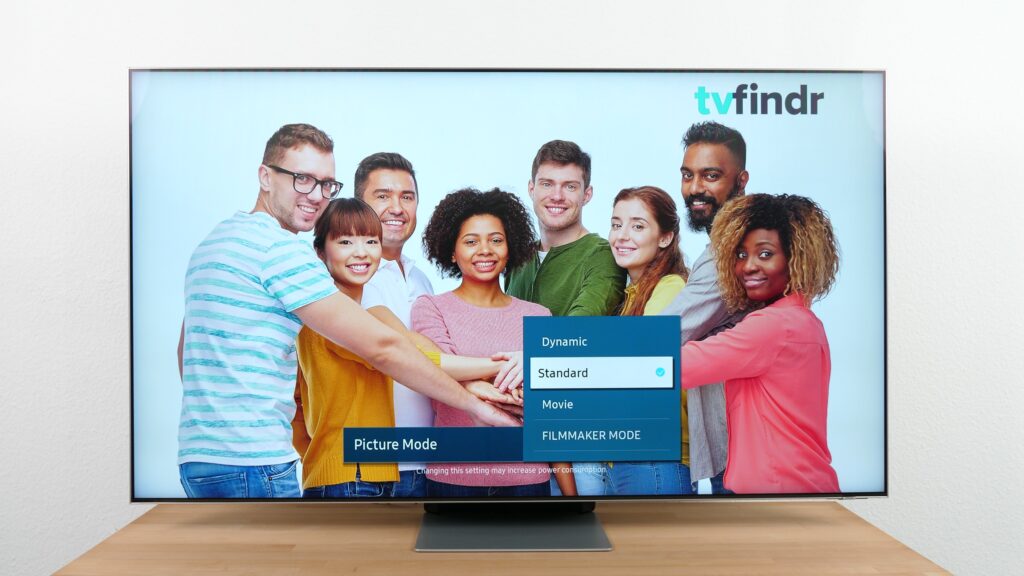
Standard
This is the default picture setup in your Samsung picture settings. No additional adjustments are made to this preset.
Although this mode has already a solid default setting but is not recommended by us.
Movie
The movie mode is designed to display image content such as movies and series in the best possible way in dark ambient light in order to implement the filmmakers’ idea as accurately as possible.
FILMMAKER MODE
If you select this preset, your Samsung TV will be able to play movies and series as close as possible to the intended representation of the original material.
The color temperature is based on an overall warm color representation. This ensures a more natural overall picture.

Game Mode
The Samsung picture settings also have a mode for gamers that summarizes all important parameters at a glance and automatically switches on as soon as the TV detects a console.
However, you cannot access this preset in the picture modes. To get to the corresponding menu, select the “Connections” tab and navigate to the “Game mode settings”.
Eye Comfort-Mode
This preset is based on the sunrise and sunset times and dynamically adjusts the image setting accordingly. Brightness and color saturation are reduced after sunset. As the name suggests, this preset ensures a more eye-friendly overall image.
The Samsung picture settings offer you these adjustments
Brightness
This option influences the screen brightness. This fine-tuning ensures that you can see dark areas of the picture in more detail. However, too bright settings can make sure that finer details in bright areas cannot be recognized well enough.
Contrast
You can adjust the area between the lightest and darkest parts of your panel. This makes parts of the image stand out more clearly from one another and gives the content more depth. A setting that is too high can lead to clipping. In this case, brightness information is “lost”.
Sharpness
Highlights contours and edges more clearly. This makes the entire image appear sharper to you. Be careful with this setting, because clipping is likely to occur here as well.
Colour
Use this option to make colors more vivid. We recommend making only very subtle adjustments at this point. If the saturation is too high, colors and color gradients will quickly look unnatural to the viewer.
Tint (G/R)
If you want to counteract a color cast, you can do so with this option. More precisely, you can use it to adjust the saturation ratio of green and red to one another. The higher the value, the stronger the color saturation for red or green.
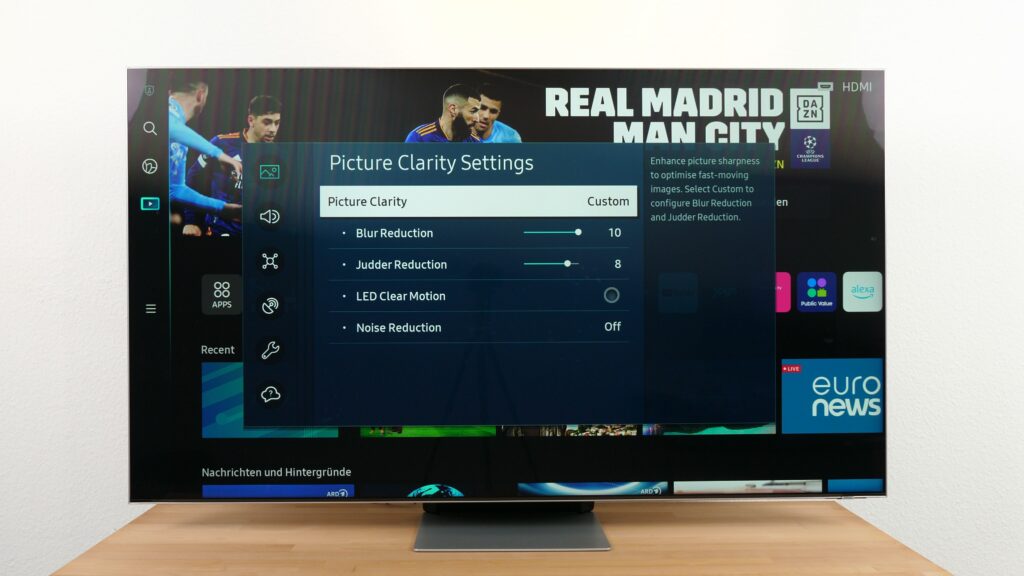
Picture Clarity Settings
This option in the Samsung picture settings allows you to optimize the sharpness of fast movements in scenes. Several sub-items are available for this adjustment. Those are in the following:
Picture clarity
You can activate the function here or set it according to your wishes.
Blur reduction
This feature in your Samsung picture settings automatically corrects blurry areas on your panel and makes them look clearer.
Judder Reduction
Minimizes the so-called judder effect that occurs especially with slow camera movements within a scene. This has to do with the so-called pulldown, in which not all frames can be displayed by the TV for the same length of time. To compensate this effect, your TV uses self-calculated intermediate frames. A high setting can lead to the soap opera effect.
LED-Clear Motion
Use this option to directly intervene in the background illumination and make images appear sharper. Basically, the so-called Black Frame Insertion function is hidden behind this term. A black frame is placed behind each image. In this way, image movements appear sharper to you. There are two decisive disadvantages of this method: First, the overall picture becomes darker by about half, and second, the BFI can cause visible image flickering for some people.
Noise Reduction
This function allows you to minimize image noise. Different levels are available for this purpose. Keep in mind that too high a setting can lead to unattractive image artifacts. Nowadays, however, signal noise is hardly a problem anymore.
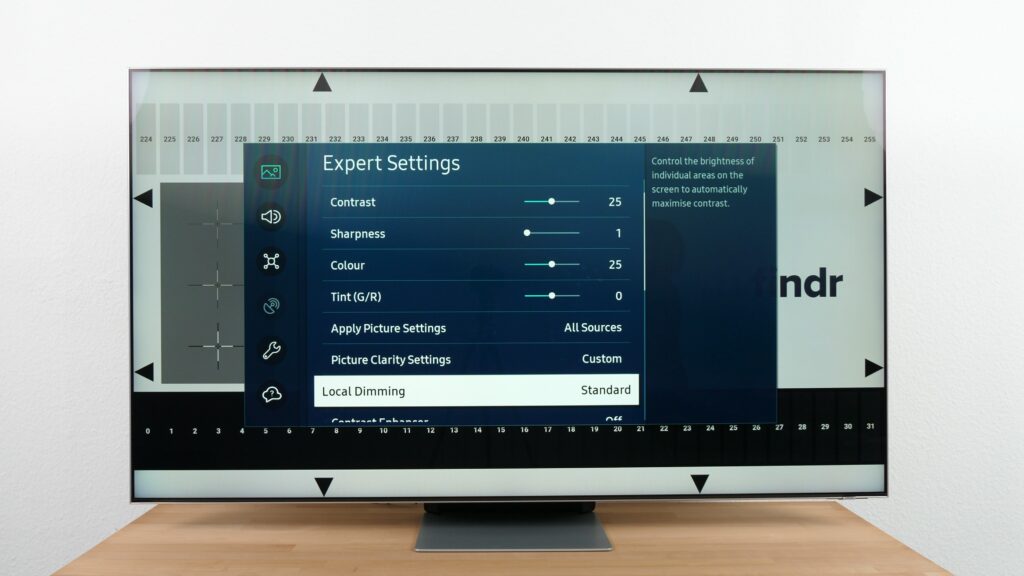
Local Dimming
Let your Samsung TV control the luminance in the individual light zones on your panel with this function.
Therefore you have the choice between “low”, “high” or “standard”.
However, you cannot deactivate it completely.
Contrast Enhancer
To counteract strong brightness differences, you can use this option in the Samsung picture settings. Depending on the preset you have selected, the image will be more or less post-processed.
Film Mode
Film mode is used to enhance transitions between frames. Color and brightness are adjusted in this case. To use the feature, the input signal must come from at least an HD source with 1080i or via a TV signal.
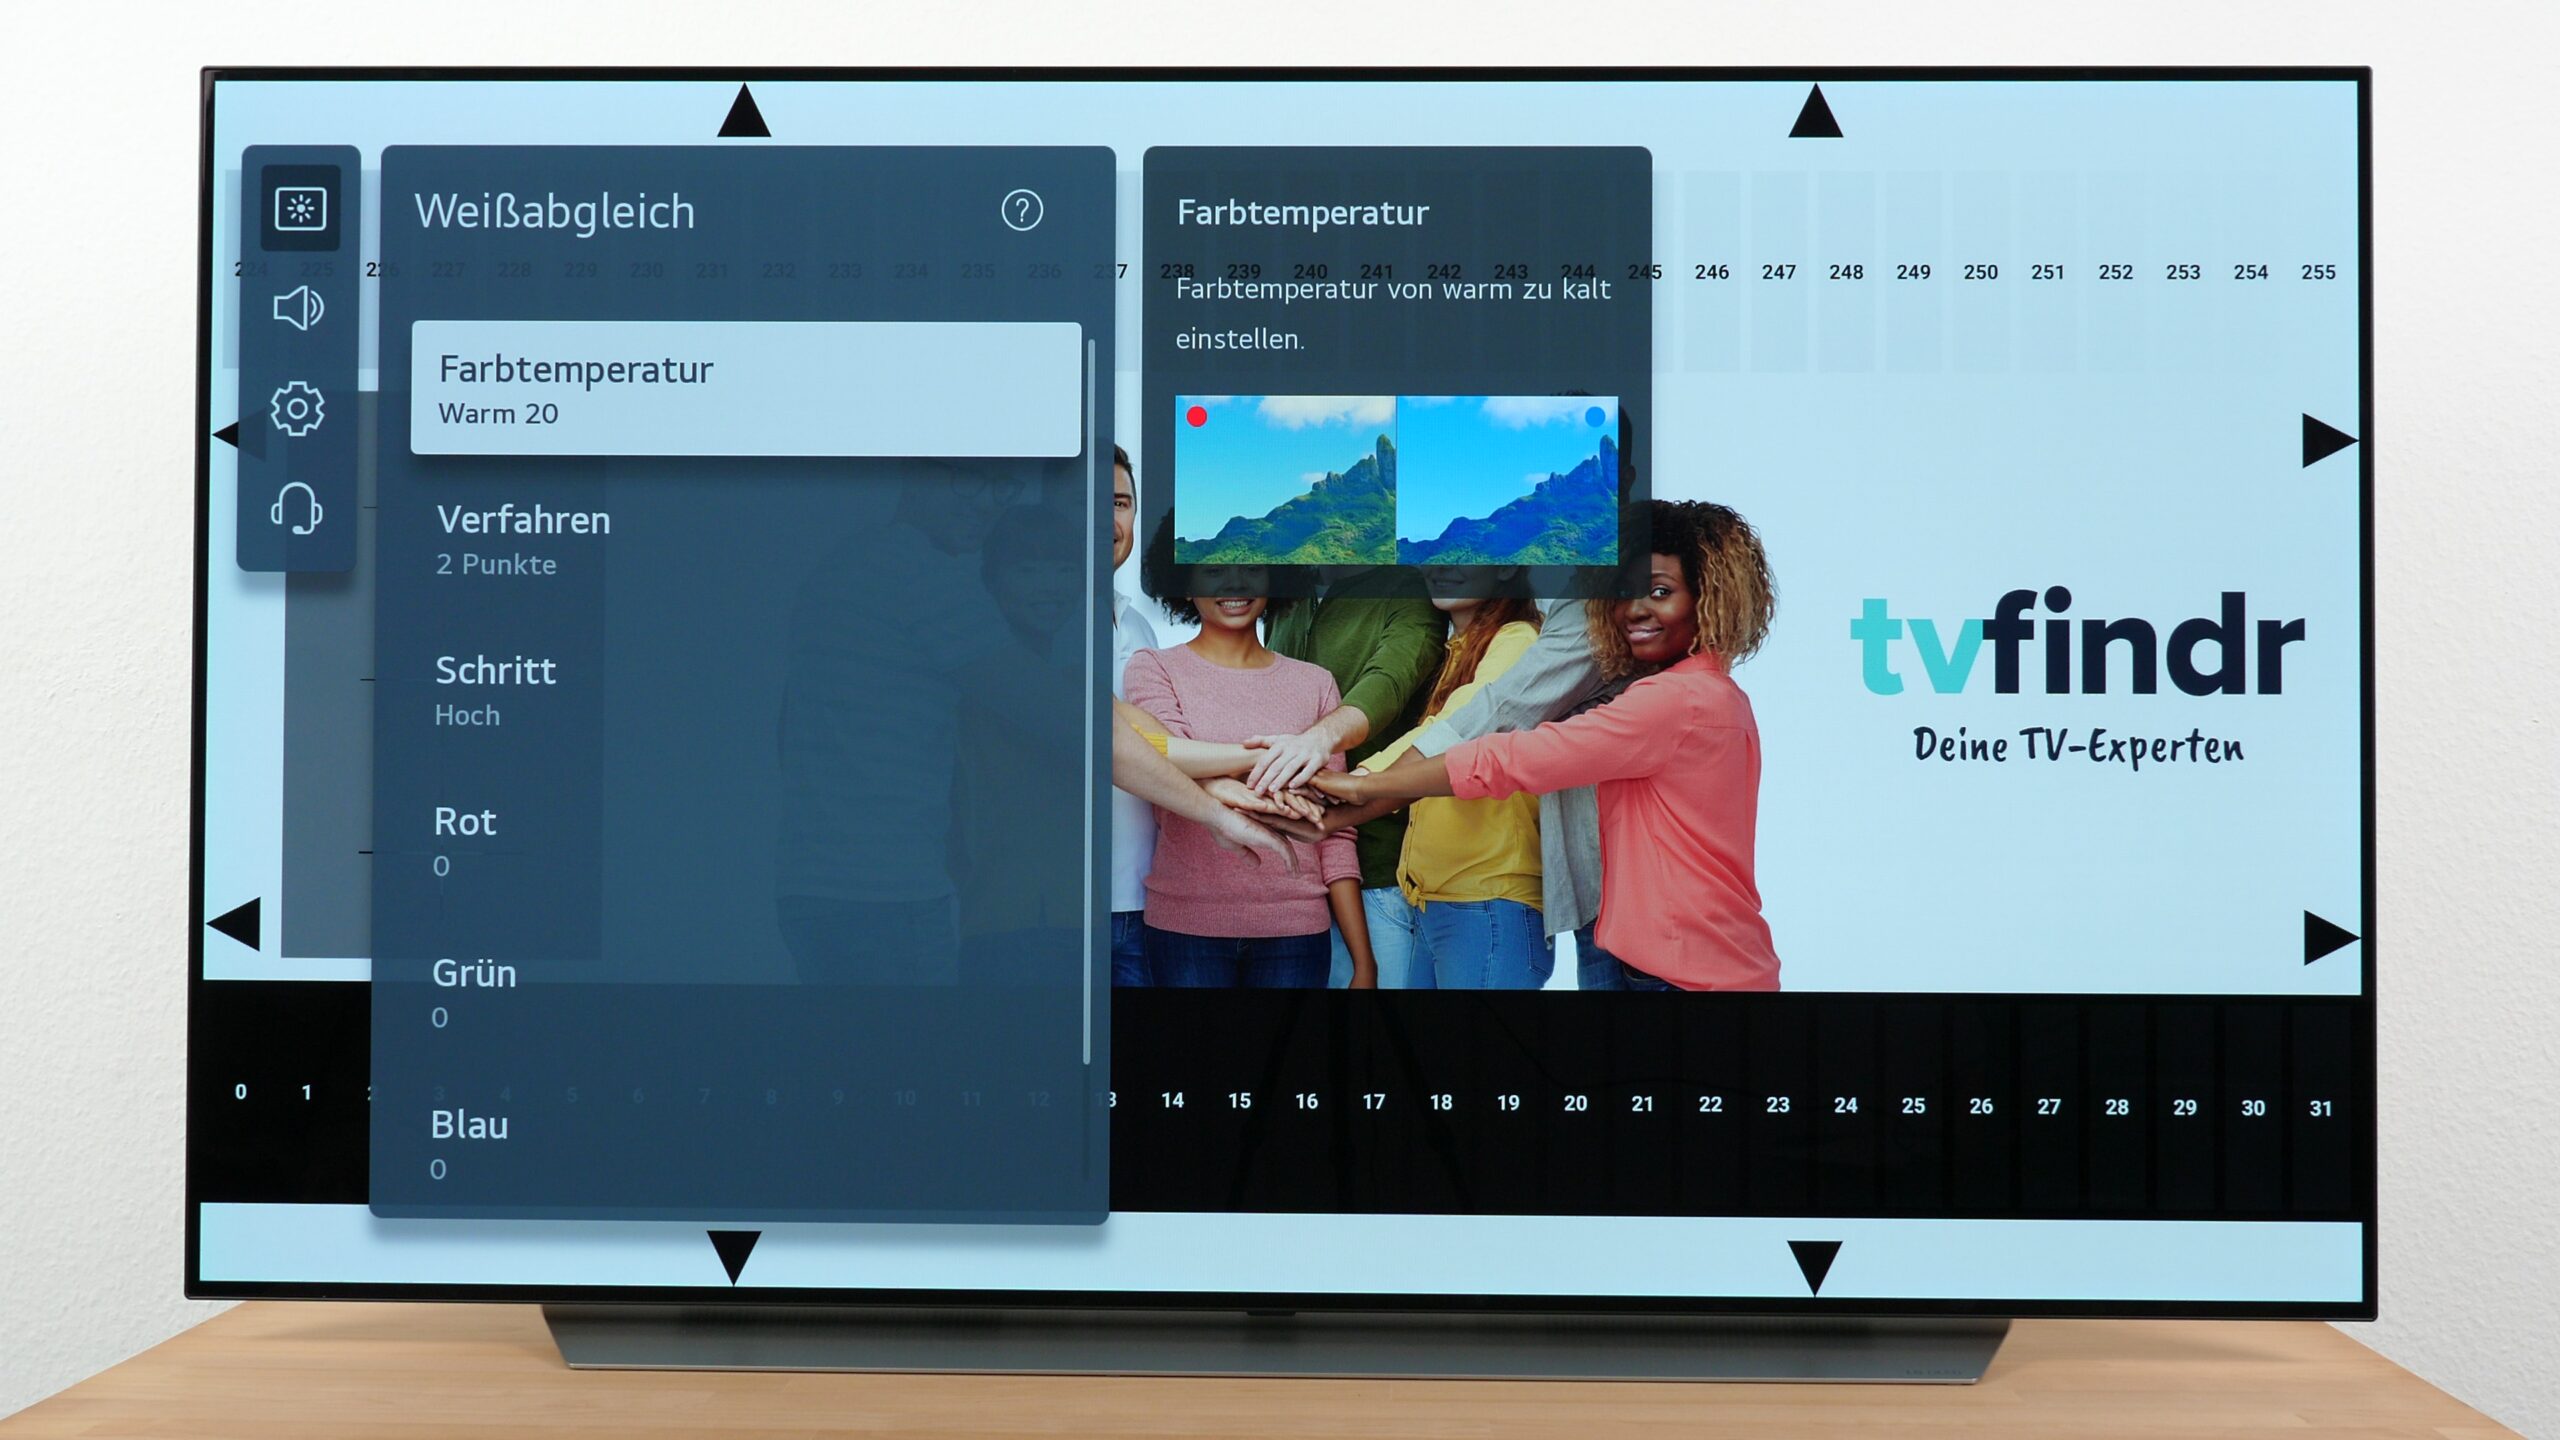
Colour Tone
You can set up the so-called color temperature with this setting. In short, you use this function to regulate the blue portion of your image. We generally recommend choosing a warm color temperature, as this best reflects the idea of the lighting conditions in many movies and series.
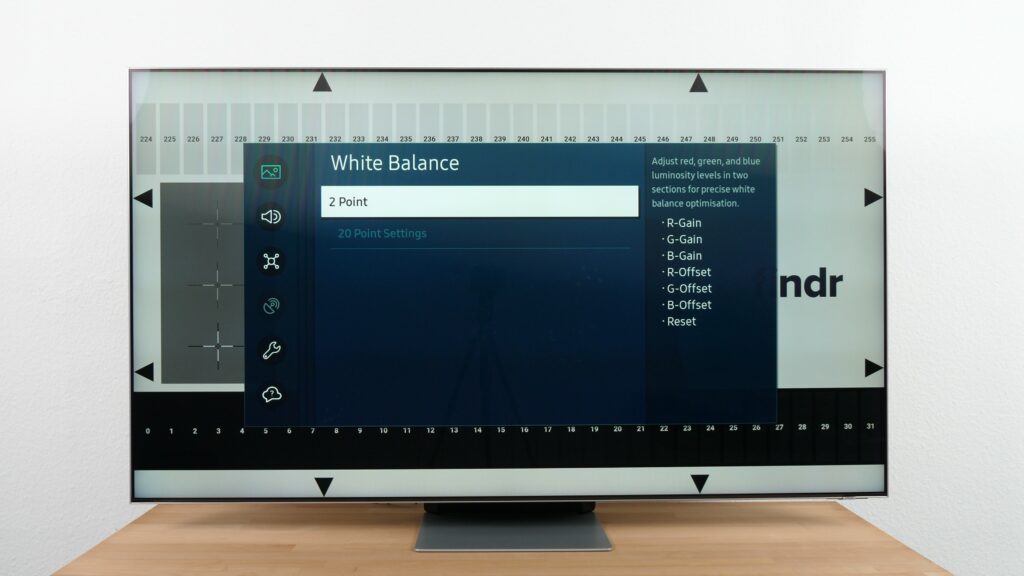
White Balance
You can use the white balance in the Samsung picture settings to adjust the panel so that white objects are displayed more accurately. This way, you can counteract color casts. A so-called 2-point or 20-point setting is available for this.
To be able to actually use this setting, you should have professional calibration equipment such as a colorimeter and the corresponding knowledge. Alternatively, you have the option of calling in an ISF-certified specialist to do the adjustment work. A professional calibration makes sense especially for high-priced TVs.
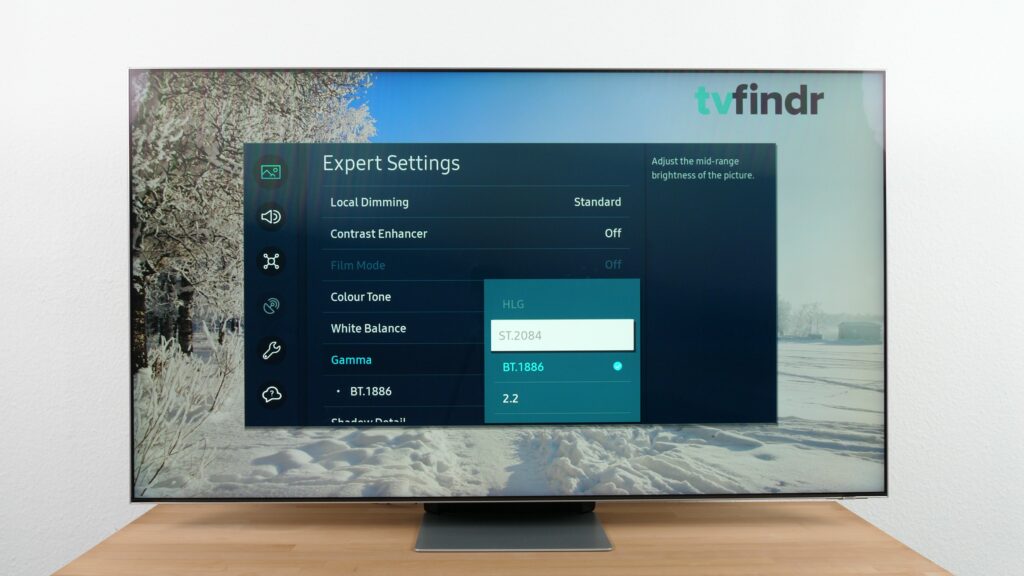
Gamma
You can adjust the brightness levels on your Samsung TV with the help of the gamma value. This setting has a direct influence on the brightness of your panel. You can choose between the options “HLG“, “ST.2084”, “BT.1886” and Gamma “2.2”.
Shadow Detail
Shadow Detail is an option in the Samsung picture settings that lets you make darker areas of the image appear lighter, increasing the detail within those areas.
Color Space Setting
This menu provides you with the option of adjusting the individual color ranges. The settings “Native”, “Auto” and “Custom” are available for this. In addition to selecting the gamut, you can also adjust the colors independently to suit your needs.
Smart Calibration
If you want to display content as intended by the producer or director, the intelligent calibration helps you with the implementation. To start this process, you have to scan the displayed QR code. The TV will then guide you through further steps.
The best Samsung picture settings – here’s how to proceed
Let’s now start with the actual setup process and the question of how best to proceed and what you should do first. From now on, we will take you by the hand in the following chapters, guide you through the most important menu points and show you what you should pay special attention to.
Once again, we would like to point out that if you are not satisfied with one of our settings or recommendations, you can change the values somewhat upwards or downwards until you are happy with the result. In principle, you can also use the following settings on a Samsung OLED TV. However, we would like to point out that OLEDs reach a different quality level in terms of black value and contrast. In addition, the backlight does not play a role in a self-luminous panel compared to LCD TVs.
Since we use special images for the calibration process, you should do the same for better comparability. The respective test patterns are available for free download. Also, make sure to perform the adjustment in light conditions during which you use your Samsung TV most of the day.
Help your Samsung TV get a natural picture
First, make sure that your Samsung TV is set to factory defaults. If this is not yet the case, this is your first step. To do this, press the left arrow button on the remote control to navigate to the menu and then to “All Settings”.
You can see some of the settings that you can make from here in the menu bar at the bottom. Of course, this is not the full range of adjustments that are available to you. Since we want to undo all settings, we are most interested in the „Picture“ tab at first.
Once there, you will find the “Reset Picture” option listed in the “Expert Settings” section. Select this option and you are done! As soon as your TV has reset all adjustments, you can start with the Samsung picture settings. Our test device is now ready and is already waiting for us to adjust it properly.
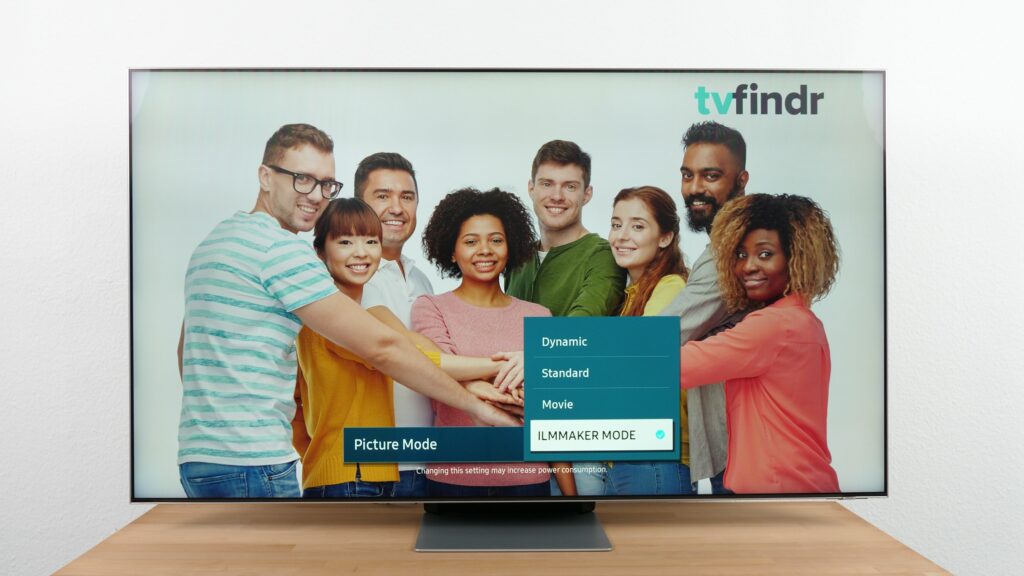
Now we’ll leave the expert settings for the time being and take care of the picture mode next. To do this, simply navigate up one hierarchical level on the menu structure. Select the FILMMAKER mode from the Picture Mode field.
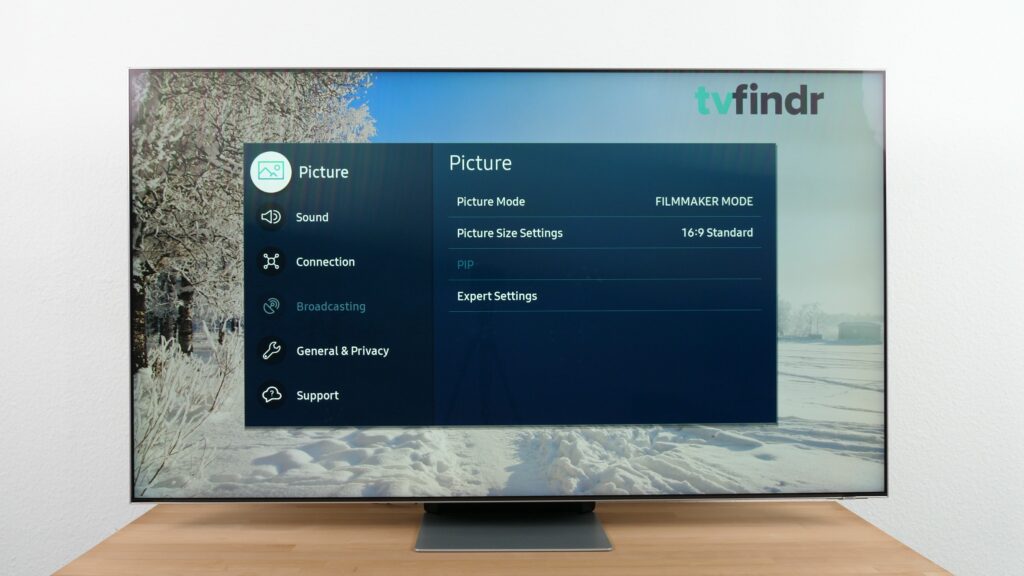
Why we choose this very preset is quickly explained: The default setting is not bad, but the color representation in FILMMAKER mode is “warmer” and therefore reflects the light and color conditions of many movies and series more accurately. In addition, the color of this setting is the most exact. Thus, we achieve a much more natural overall impression on the screen. You will quickly get used to the decent yellowish tint of the picture.
The lower blue proportion with which this picture mode operates is responsible for this. This setting is especially useful for LED TVs. The reason: TVs with LED technology tend to have a comparatively high blue level in their panels, which is thus greatly reduced. We will now use this preset as a starting point for our next steps on the way to the best Samsung picture settings.
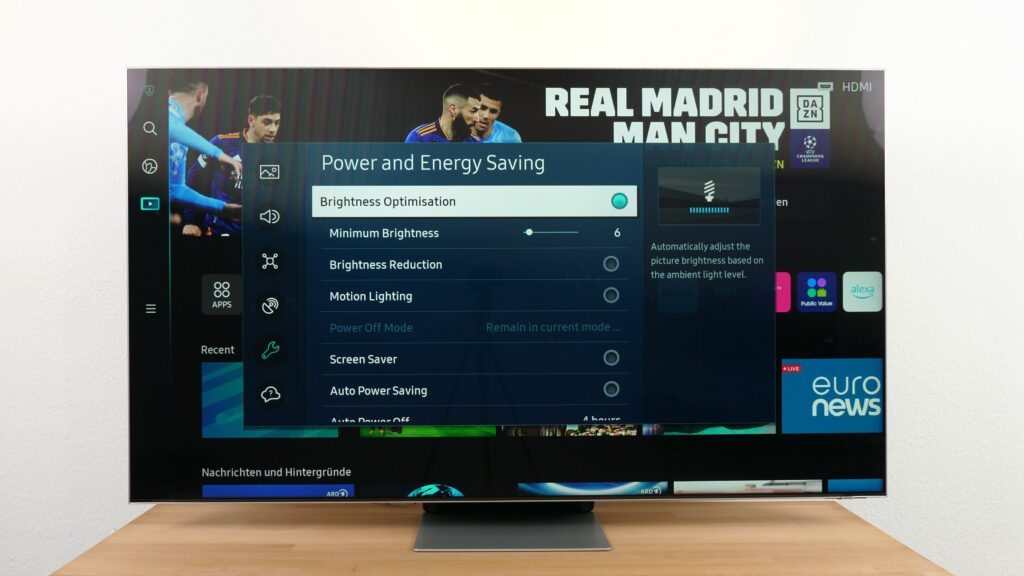
How do you deal with the light sensor? If you like to use your Samsung TV in different lighting conditions, it might make sense to activate the sensor. This ensures that the TV always adjusts the screen’s brightness to the surrounding brightness during playback. Although you save power with this setting, it results in a loss of picture quality.
To make this adjustment, navigate to the “General and Privacy” tab and then to „Power and Energy Saving”. By clicking on “Brightness Optimisation”, you can activate this function and make several additional detailed settings.
Since we now have a good foundation in terms of contrast, brightness and gamma due to the FILMMAKER Mode, we will next take care of the backlight. For this, we look at the configuration of Full Array Local Dimming and disable most of the image enhancement algorithms in this area.
To check this, we go to the Samsung picture settings again and select the expert settings. Here, we first check whether the Picture Clarity Settings are deactivated and “Local Dimming” is set to standard. Both should have already been preconfigured by selecting the FILMMAKER mode.
If the local dimming level is too “high”, this can lead to so-called clipping.
On the other hand, an effect called black crush can also occur. So, if you want to use this function, make sure to use a rather neutral setting.
The contrast enhancement should also have been switched off by our pre-selection of the preset.
Depending on the content shown, details may also be lost when using this image correction, as lighter areas of the screen are brightened further and darker areas are darkened even more.
The intensity of the backlight also plays a role for the so-called blooming effect. This is another reason why we recommend a balanced setting in the midrange. You can even adjust the setting a little lower, depending on the content.
Selecting contrast setting and brightness in the Samsung picture settings
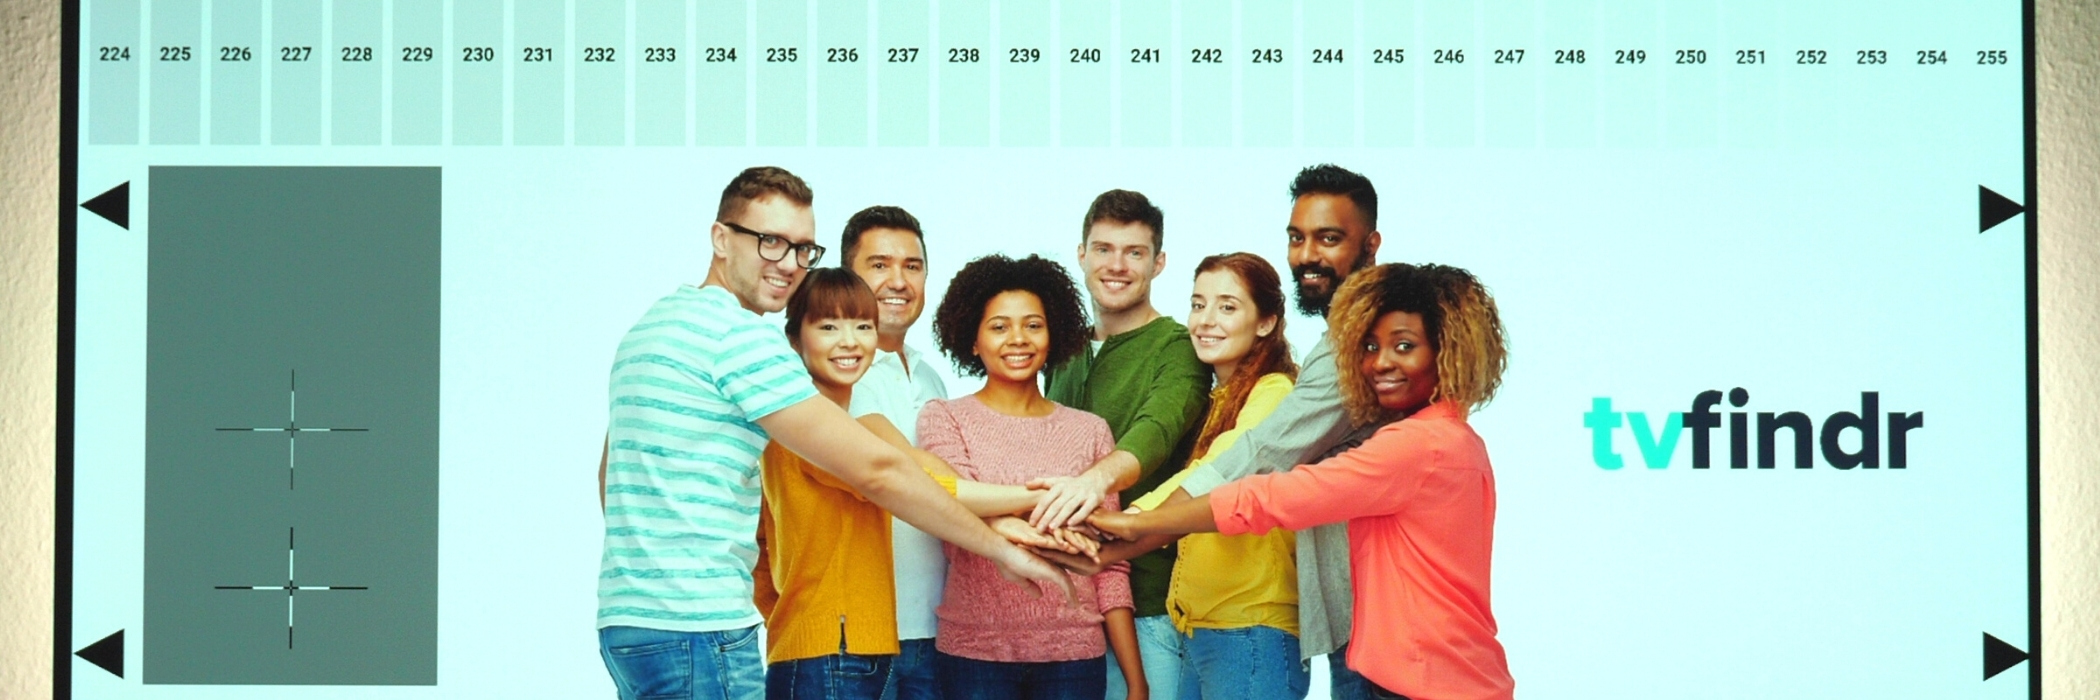
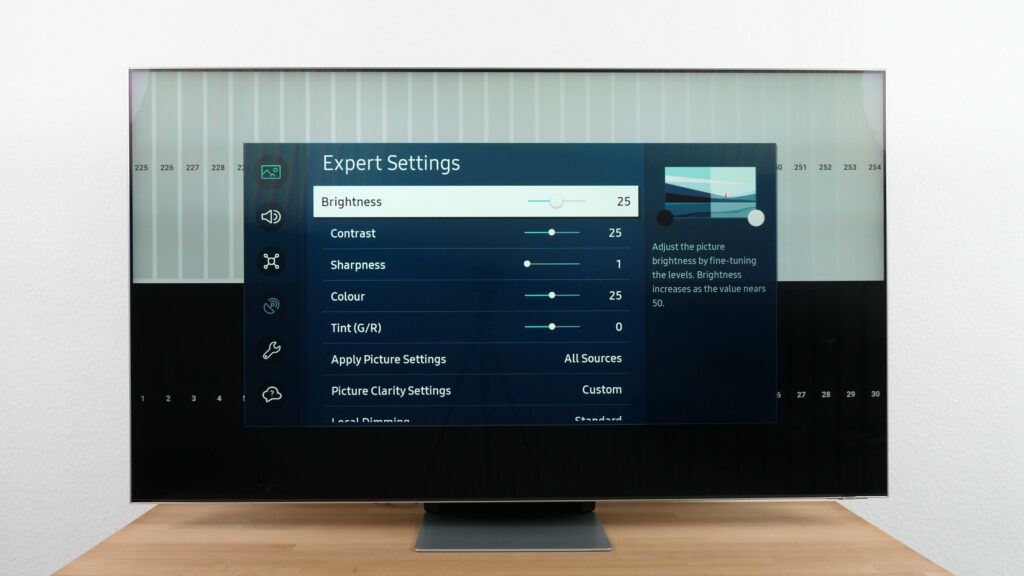
Now that we have adjusted the backlight and the automatic image corrections in the Samsung picture settings, we move on to the settings for contrast and brightness. Please use our test image with the luminance grades for this. Starting with level 1 in the dark area up to level 254 in the bright area.
In order to achieve the best possible calibration, you should first make sure that you can clearly recognize all upper gradations from each other. With an initial value of 35, the levels between 252 and 253 are still visible on the panel of our test device. At the same time, this setting still allows the black levels to have enough depth.
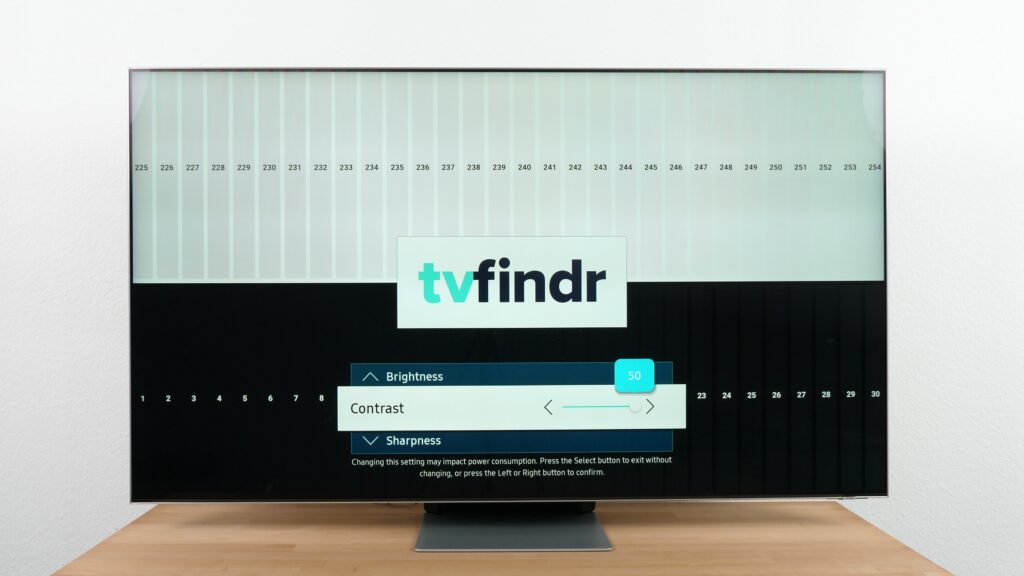
When adjusting the brightness in Samsung’s picture settings, we now do the exact opposite and look at the dark areas on the test picture. Can you clearly see the difference between them or do you have problems? If the answer is the latter, try a value of 25 and work your way around this value until you can make out as many of the black levels as possible. However, don’t confuse the adjustment of the backlight with the actual screen brightness of your panel. We already adjusted the first one in the previous step.
With this setting, all levels are quite clearly visible on our test device. Accordingly, dark scenes should also show little loss of detail and black crush should thus be clearly minimized. Apart from the calibration for contrast and brightness, the parameter for correcting the gamma value is also available in Samsung’s picture settings.
This setting is not trivial and specifies how the brightness levels should be translated by your Samsung TV. Our test device is already set to BT.1886, which is the standard for SDR content and the most common setting for home cinema in dark rooms. If you prefer to use your TV in brighter lighting conditions, you can also change the setting to 2.2.
Adjusts the colors in the Samsung picture settings
Usually, even minor changes in Samsung’s picture settings are sufficient. However, you can usually neglect this section. This means that you will have a relatively easy time here. If you still want to make changes, then only do so slightly and proceed with caution.
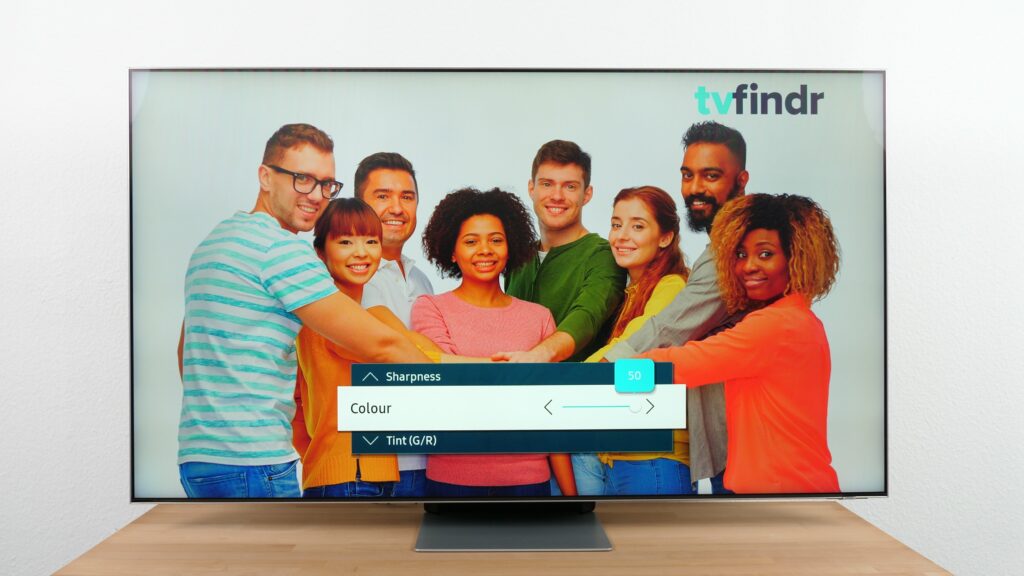
As already mentioned, we have a solid basis of settings thanks to the FILMMAKER mode. This is particularly evident in terms of color settings. Thanks to this preset, the amount of blue color is already relatively low.
With the help of the so-called color saturation you have the possibility to display the colors on your panel more vividly. Our suggestion: Keep both the colour tone and the saturation value as they are or only adjust these values very slightly. Although you will achieve stronger colors with high values, you will also create more unnaturalness in the picture. This does not make the reproduction of the content more precise. However, it is ultimately up to you to decide what suits you best.
Samsung’s picture settings also have a red-green shift. You can use the option „Tint (G/R)” for this. As soon as you move the slider in one of the two directions, all color values are shifted to red or green accordingly. Since this function is more likely to harm you than to help you achieve a better overall picture, we will skip this setting.
Attention: The descriptions for the color tone and the color temperature usually mean the same thing. In this case, Samsung has misleadingly given the terms different purposes.
Samsung picture settings: Here’s what you do to make your display sharper
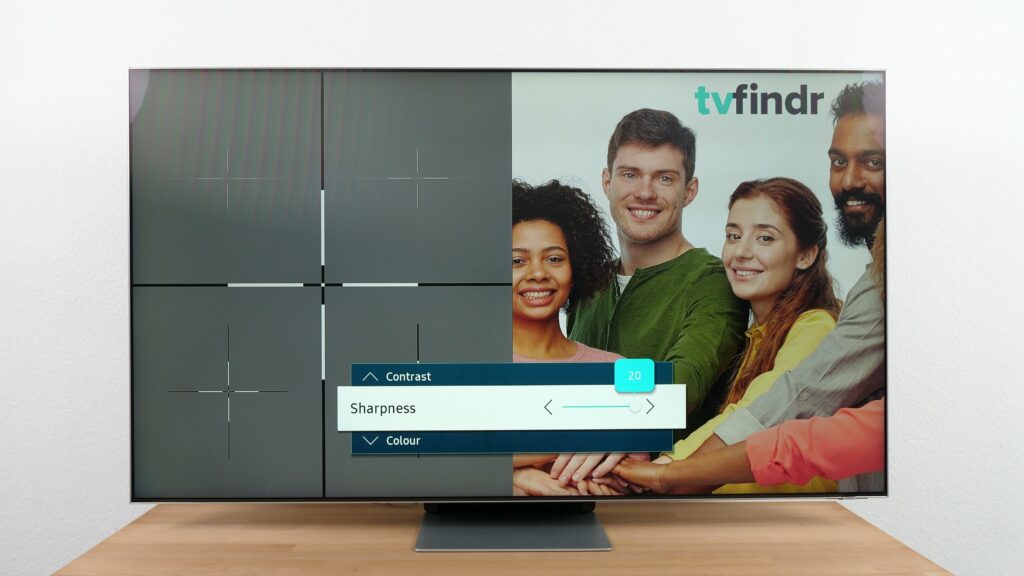
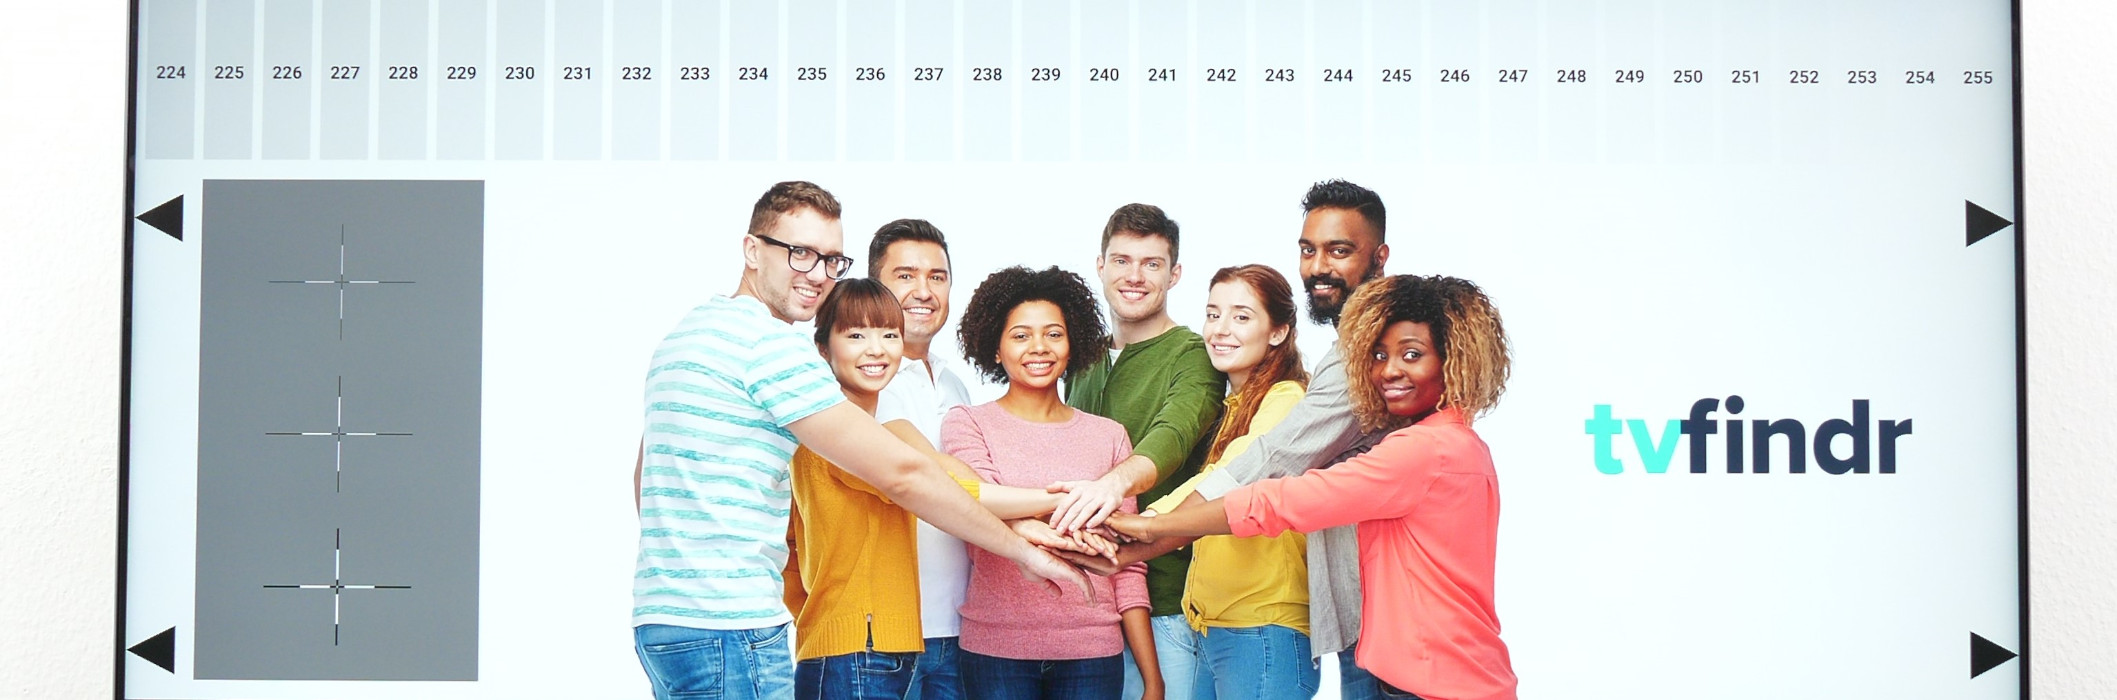
The sharpness level of the panel determines how clearly your Samsung TV should highlight contours from each other and how strongly corners and edges are accentuated on the screen. In order to start with the settings, you have to do some preparation work and load the test image consisting of the four gray crosses and the group of people on the TV screen.
Now set the sharpness value to zero. Once you have done this, you can immediately start with the adjustment. Keep an eye on the cross structure during the adjustment and make sure that you can see all contours cleanly. What we want to avoid in any case are double contours around edges.
Once you are satisfied with the result, take a look at the people in the right part of the image and focus specifically on their hair. Adjust the image to a point where the strands can be distinguished from each other as clearly as possible, and don’t forget about the double contour. Our test device made the adjustment easy for us in this case. A slight change to the value 1 was enough to give the image the necessary sharpness kick.
These were the basic adjustments for the SDR section. As you may have noticed, we only had to make comparatively few adjustments up to this point, since the FILMMAKER mode, as already mentioned, provides a good basis.
Adjust the image movement in the Samsung picture settings
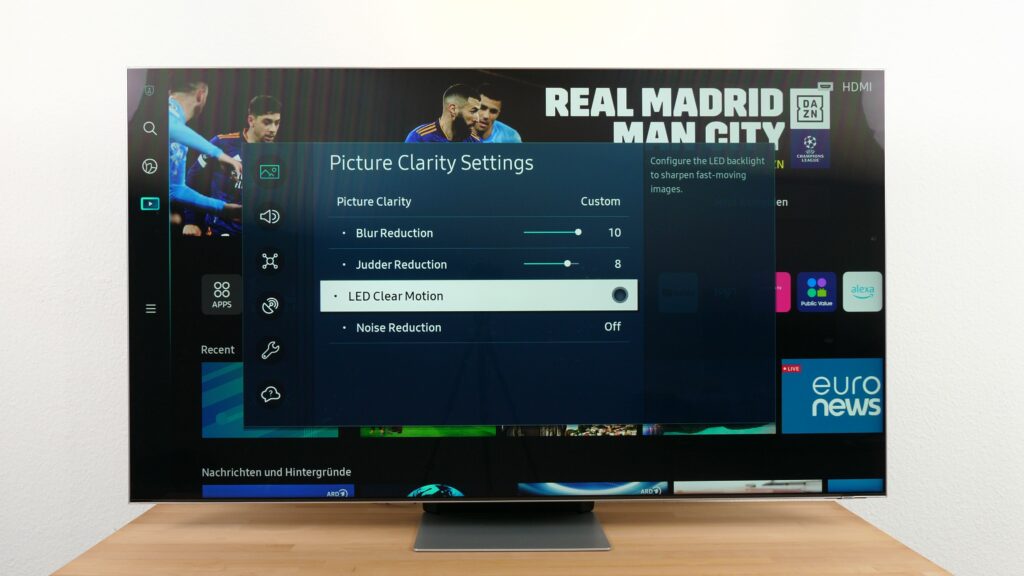
Let’s now take a look at the available options for motion optimization. To access these features, navigate to the “Picture Clarity Settings” in the “Expert Settings”, which you will find in the “Picture” tab.
You will notice that all options are grayed out with the exception of Picture Clarity. To change this, turn the “Off” entry to “Custom”. This step activates the interpolation and gives you access to the settings of the Black Frame Insertion feature and the Judder Reduction. Since this feature – depending on the setting level – can lead to the Soap Opera effect, we recommend enabling it only for content with 24 frames per second.
The Black Frame Insertion feature is activated via the menu item “LED Clear Motion” in the Samsung picture settings. We deactivate this setting because the overall picture not only gets darker, but there is also a risk of flickering. Finally, we also disable the interpolation completely since we do not want to use either of those features.
Options to optimize your gaming experience
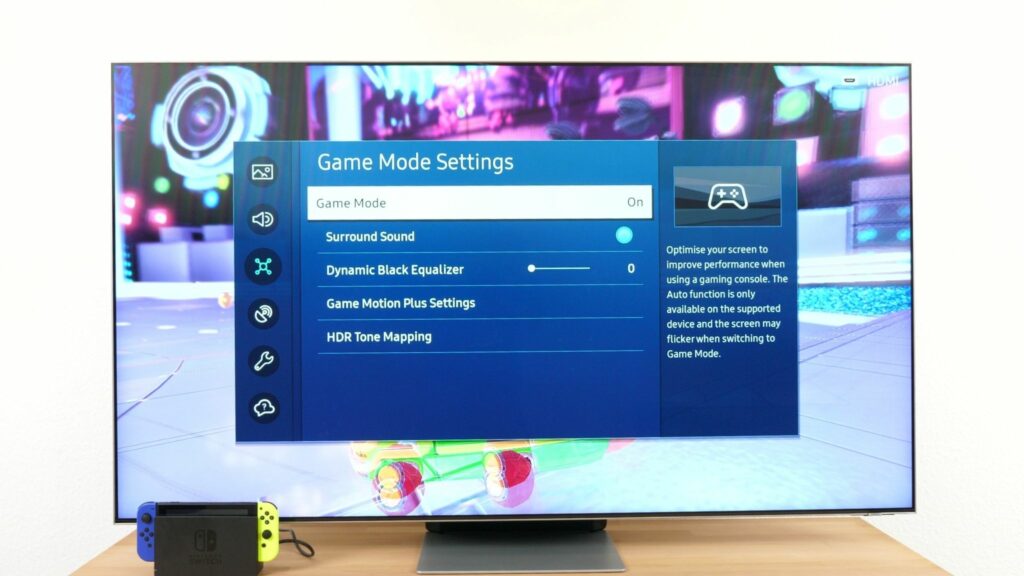
In the Samsung picture settings you will see the option “Game Mode“. If you activate this preset, the TV switches to the lowest possible input lag, reduces screen tearing, and displays HDR content more brilliantly. On our test device, this all works via AMD’s Free Sync Premium Pro feature.
If you don’t like the settings, you can always make individual adjustments via the Game Bar 2.0. For example, you can change the frames per second that are displayed on the panel. Within the gaming mode, you can also choose from specific picture settings for different genres.
If you are a shooter fan, you can use the FPS mode, for example. If you prefer playing FIFA, you can choose Sport. There are also individual parameters that you can set in the game mode settings.
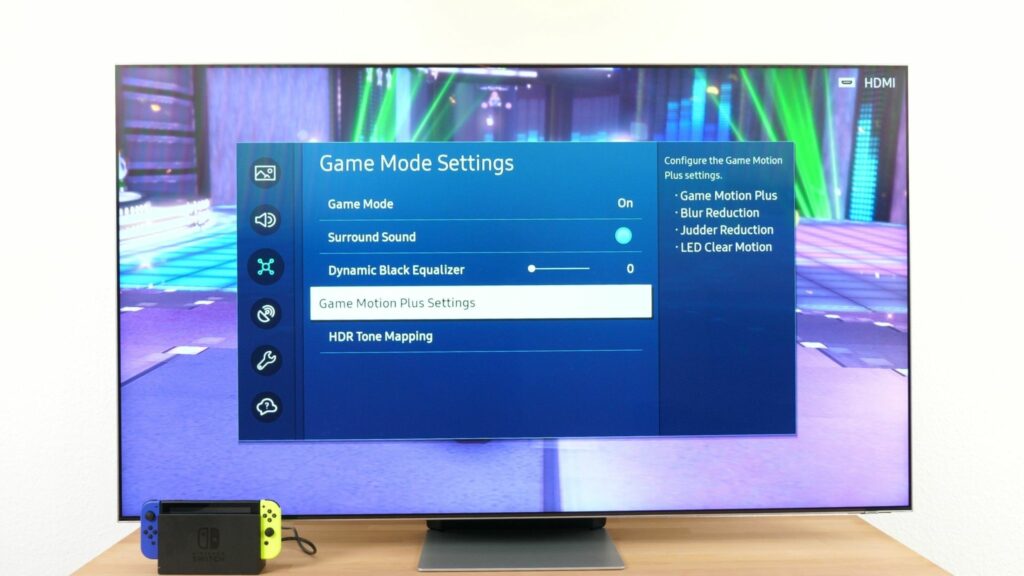
The “Motion Plus Settings” offer the same motion options as in the normal movie mode. In a nutshell, this means:
Interpolation with judder reduction and the black frame insertion function via the “LED Clear Motion” option for reduced motion blur.
Samsung does not offer an option for Dolby Vision, but we can use HDR10+ gaming on our test device. However, the gaming side has to be supported in order to use the dynamic HDR format.
As already shown, you can now also further adjust the picture to experience your favorite titles in optimal SDR and HDR quality.
These HDR options are available in the Samsung picture settings
Now let’s take a look at the settings for High Dynamic Range images. As with the adjustments for the color of your Samsung TV, you don’t have to do much here either.
Basically, the TV needs an HDR signal to enter the HDR FILMMAKER mode. For example, you can use common streaming providers like Netflix and Co. or Blu-ray content. The name of the preset does not change.
If you now look at the “Expert Settings”, you will notice that a lot has changed. Contrast and brightness have now been set to the maximum value of 50. This allows your Samsung TV to make highlights appear more brilliant in HDR content. In addition, you should now also set the local dimming to maximum. Reduce the intensity of this setting a bit if you notice artifacts.
Make sure that you use a gamma correction that is suitable for HDR. ST.2084 serves as the default for this and should be selected by default. If this is not the case, switch to it accordingly.
FAQ – Frequently asked questions about Samsung picture settings
How do you change the picture settings of your Samsung TV?
The picture settings of Samsung models are hidden in the “Picture” menu under “Expert settings“. Besides the usual values like contrast, brightness and sharpness, there are many additional options available.
Which picture mode is best for Samsung TVs?
To get the most natural colors possible, we recommend using the “Film” image mode. This also ensures that your image content is close to the intended look of the production studios.
How do I know if HDR is active on my Samsung TV?
To check if HDR is enabled on your Samsung TV, select “External Device Management” in the general settings and activate the entry “HDMI UHD Color“.
Which Samsung TV has the best picture?
The Samsung Neo QLED QN95B is currently one of the best 4K TVs in terms of brightness. If you are looking for the best possible contrast, go for the Samsung S95B QD-OLED. However, the picture quality generally depends on many additional factors.

tvfindr Editorial
As a studied technology journalist Tobi likes to write regularly about the colorful world of TV sets & Co. Further interests: Music, cars, gaming, soccer