The best Philips picture settings – explanation & recommendation

If you want to get the best Philips picture settings, you should rely on one thing in particular: We are talking about your own taste. Yes, you are reading that correctly. After all, everyone’s individual perception is a subjective one, and someone’s liking doesn’t necessarily mean that others will like it as well. Of course, you should still stay within a certain range with the changes made to the visual appearance of the image. We’ll tell you what this might look like in this guide.
Note: This guide shows the possible settings of our Philips OLED+ 936 TV. In individual cases, the menu entries might be different from yours. In general, we rely on our own TV test pictures, which we provide free of charge for you, to adjust the settings. You can easily upload the needed calibration picture on your Philips TV via USB stick, laptop or Apple AirPlay. The display quality of your panel also depends on your positioning relative to the screen. Although experience shows that this factor is less important for OLED TVs, you should make sure to adjust everything from the same position. Usually from the position where you use your TV the most. Comparable lighting conditions are also important.
It takes a variety of ingredients to create a good picture
Which Philips model do you use at home? For example, one with an LCD panel, lots of brightness but comparatively weak contrast, or the self-luminous technology of OLED TVs with unbeatably good black levels and rather worse luminance values.
In which environment is your Philips TV placed? A very translucent room with lots of daylight or the darkroom of your home theater?
What do you usually use your TV for? Do you mainly watch sports, play games, or does your preferred content consist more of movies and series?

Minor differences of the devices: Even identical models can have minor differences.
The viewing angle to the panel of your TV: Do you usually look at the screen from the front or do you typically sit at an angle to it? The viewing angle is by no means insignificant.
Your own preference: Your own visual perception will ultimately set the tone and throw all settings out the window if you consider the image to be bad.
These are the Philips picture settings you can choose from
A lot of picture modes are waiting for you to try them out in the Philips picture settings. Android TV offers different presets at this point. To give you an overview, we will now take a closer look at these predefined presets and tell you what you can expect from the various modes.
Personal
In the “Personal” picture mode, you can make and save individual presets.
You can easily apply your preferred display settings via the advanced picture settings.
Vivid
With this preset, your Philips TV activates all picture enhancements. Since motion handling is also affected, we recommend this adjustment especially for sports content and at daylight.
Disadvantage: Due to the strong colors of this option, the image looks unnatural.
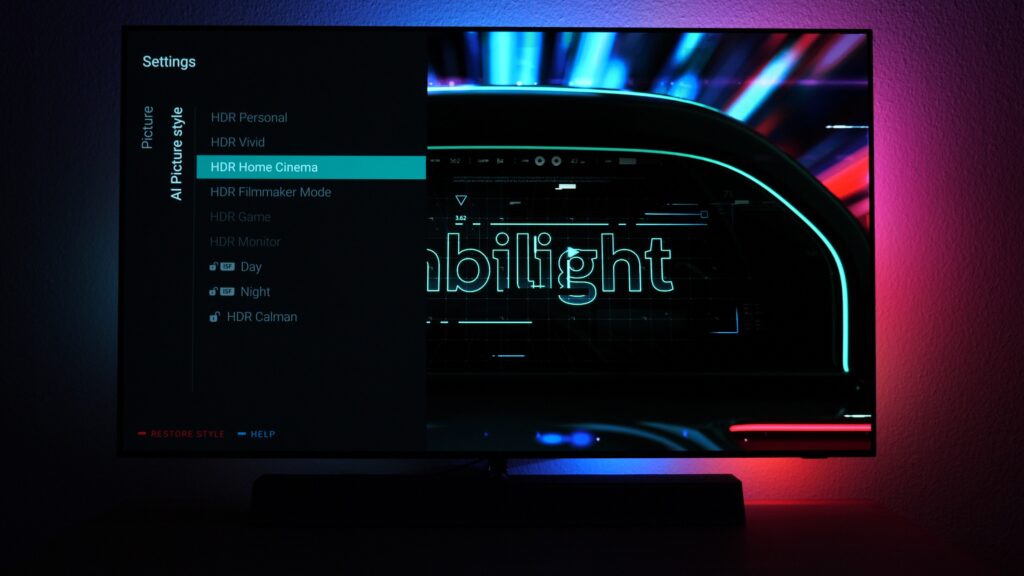
Home Cinema
In this setting variant, the numerous AI image enhancers are not as noticeable as in the “Vivid” picture mode.
Colors and sharpness levels are nevertheless considerably improved and also contribute to a rather unnatural overall picture.
Standard
The standard mode works with increased proportion of blue in the image. This makes colors appear rather cold to the viewer. Apart from that, the Eco Sensor also turns on together with this mode to save energy depending on the lighting conditions. However, this is at the expense of the overall brightness.

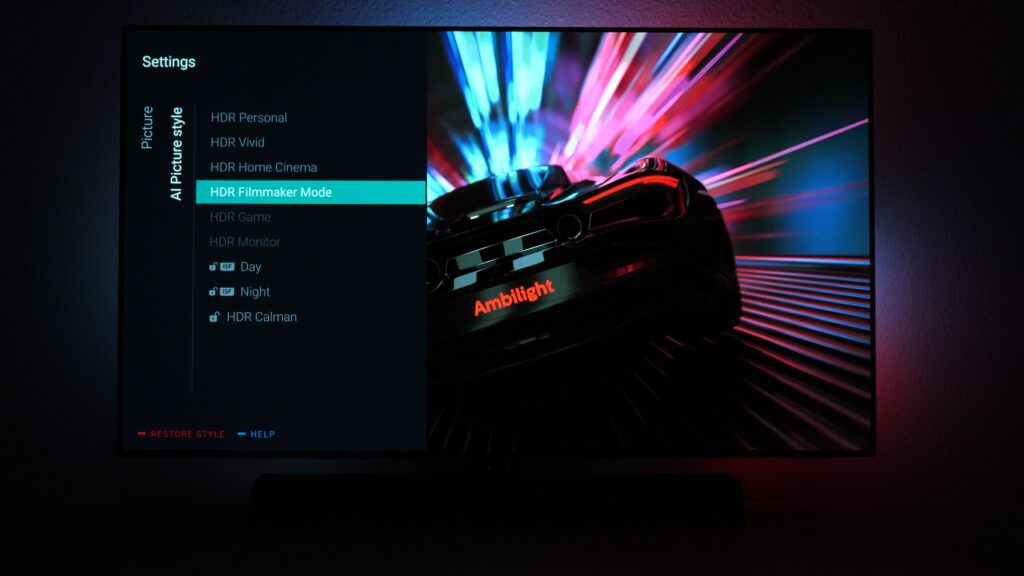
Filmmaker Mode
The special feature of the Filmmaker mode aims at a “warm” and thereby natural coloration.
Settings for sharpness, contrast, brightness and colour are close to the basic settings. This way, movies and series can be viewed on your Philips TV with colors that are extremely close to the original.
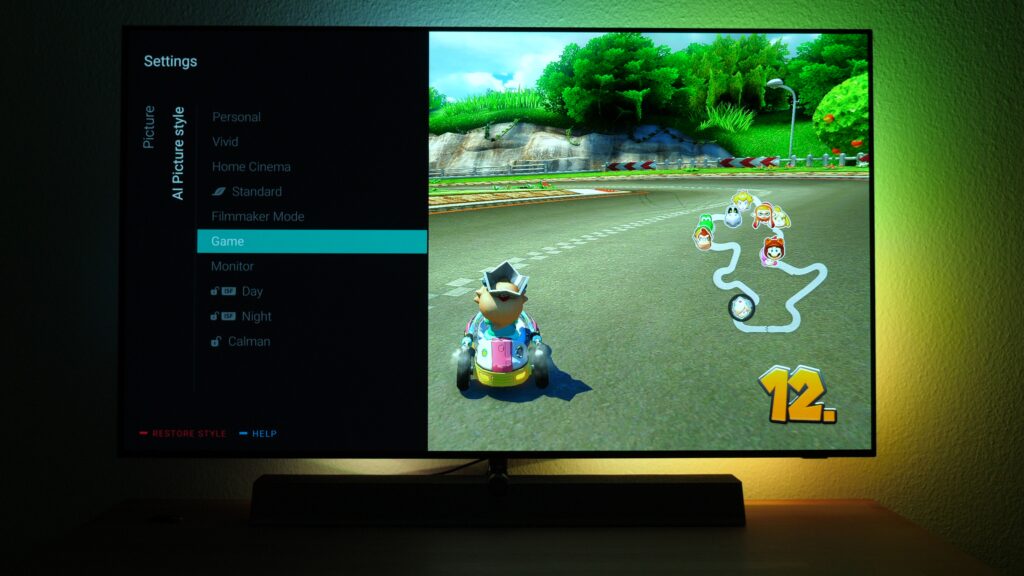
Game
This picture mode, which is intended for video games, reduces the so-called input lag. This setting is particularly useful for titles with a fast game flow. Your Philips TV detects connected consoles via the so-called Auto Low Latency Mode, also called ALLM, and switches automatically.
Monitor
If you want to use your TV as an additional screen on your computer, select this setting. Now you can make the individual picture adjustments individually or with the help of this guide.
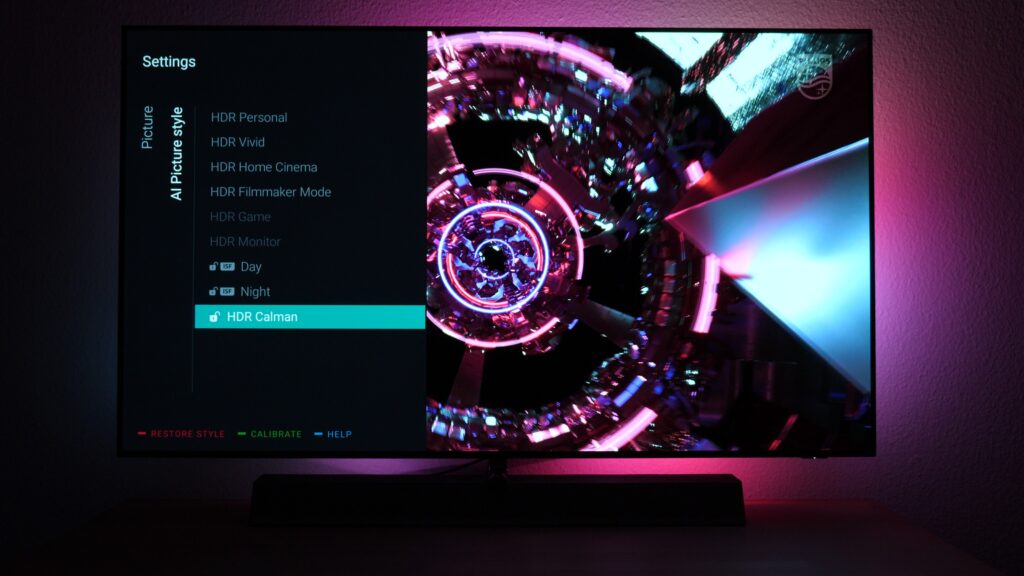
Calman
The so-called Calman mode is the expert adjustment among the presets. Here you can control a large number of modifications and configure parameters in a very fine-grained way.
Unless you have the appropriate setup equipment and the necessary calibration skills, we do not recommend this option.
However, with a professional adjustment by a so-called ISF expert, you can still get quite a bit of additional picture quality out of your panel, especially with TVs in the upper price ranges.
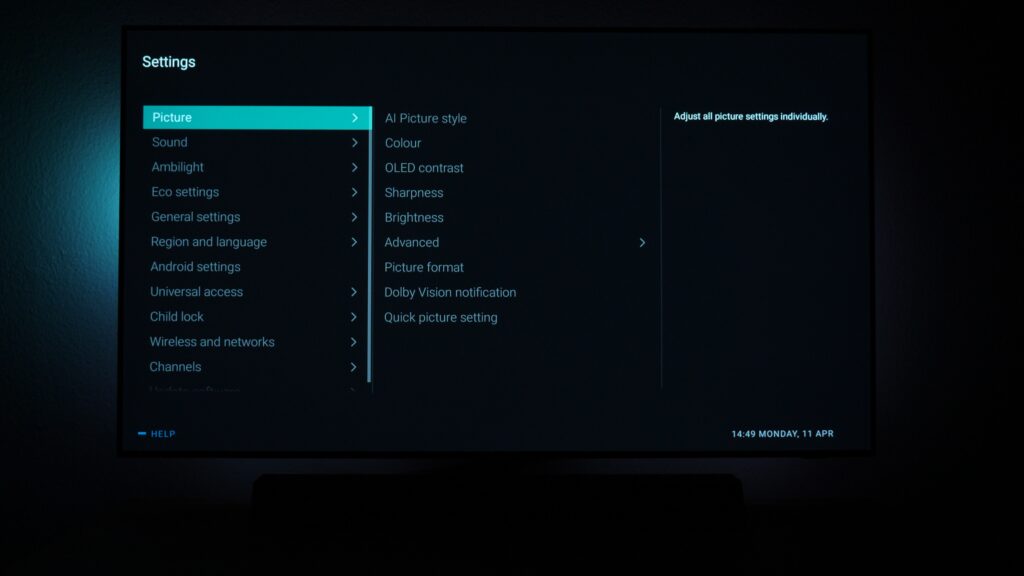
The adjustment options in your Philips picture settings
Brightness
One of the most important factors in screen calibration is the brightness. In order to highlight shadows and make the overall image more detailed, you cannot avoid this setting parameter.
But be careful: A picture that is too bright has a negative effect on the image information, just like one that is set too dark, and loses quality according to this.
In this context, you may have heard of the terms Black Crush and Clipping.
Contrast
Besides the brightness, a well adjusted contrast is also very important for the picture quality. Unlike the brightness, this parameter determines the difference between the brightest and darkest levels on your screen. There is a risk of clipping with this setting as well.
Perfect Natural Reality
This term refers to the HDR upscale function from Philips. An HDR effect is simulated by artificially increasing contrast and brightness. Details are supposed to stick out better this way.
HDR perfect
This function is directly related to the HDR-Upcale feature and is only activated when you select Perfect Natural Reality. This hides additional settings that are available to you.
HGiG
The abbreviation stands for HDR Gaming Interest Group and refers to content that is provided by HDR-capable consoles. Unlike the display of movies and series, where certain display specifications are also transmitted within the HDR signal, your TV calculates the display of gaming content dynamically. The so-called tone mapping is bypassed and already takes place in the console.
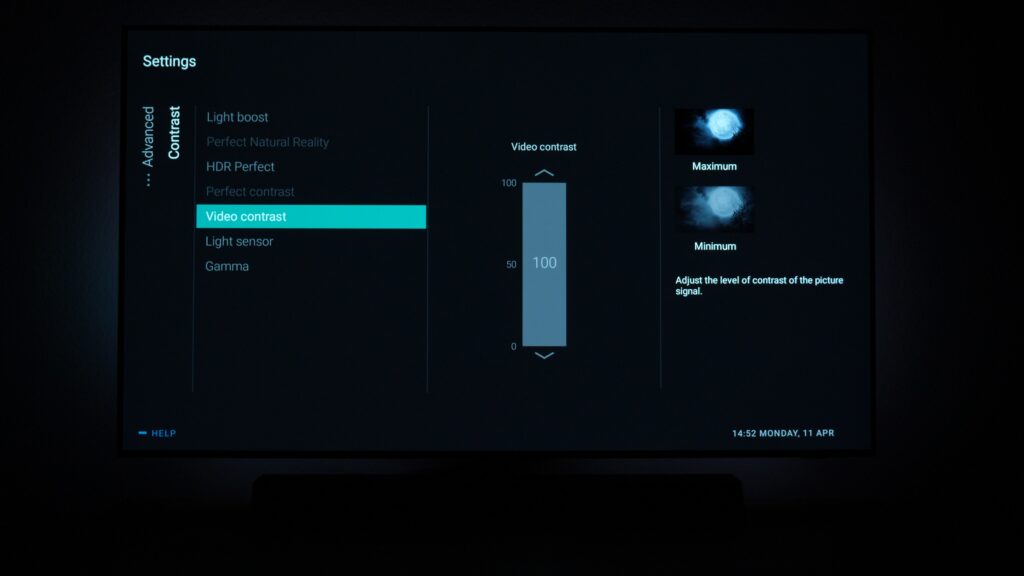
Video contrast:
When talking about video contrast, Philips means the setting for the generally known contrast value. Within this option, you can determine the difference between bright and dark areas that the picture assumes. The higher the setting, the bigger the difference.
Light sensor
If you switch on this option in your Philips picture settings, the TV dynamically adjusts the brightness of the panel to the environmental brightness of the room.
Advantage: You can use this function to save power in dark lighting conditions because the overall brightness of your TV will automatically be reduced.
The downside: Along with the luminance, the image performance also decreases. Therefore, we recommend deactivating this option at least in the preparation of image adjustments. However, if the image reproduction looks too pale, the installed sensor might not work correctly.
Gamma
In opposite to contrast, where you set the difference between the brightest and darkest display value of your TV, you control the brightness midpoints on your TV panel with the help of the so-called gamma level in your Philips picture settings.
Sharpness
You can set the degree of edge accentuation in your Philips picture settings under Sharpness. Margins and contours are greatly highlighted with this option. However, this function does not work completely without restrictions.
On one hand, clipping, which we already mentioned several times, can sneak in at this point and cause details to be removed from your image. On the other hand, too high setting values in this area quickly lead to so-called double contours on edge gradients.
Ultra resolution
This function in your Philips picture settings highlights contours particularly well and therefore improves the sharpness of the display.
Noise reduction
This filter offers several intensity levels. The function can remove noise from the image artificially. The disadvantage: ugly image artifacts may appear.
MPEG artefact reduction
As with noise reduction, an artificial filter is used here as well to filter out artifacts in MPEG-encoded content from the image.
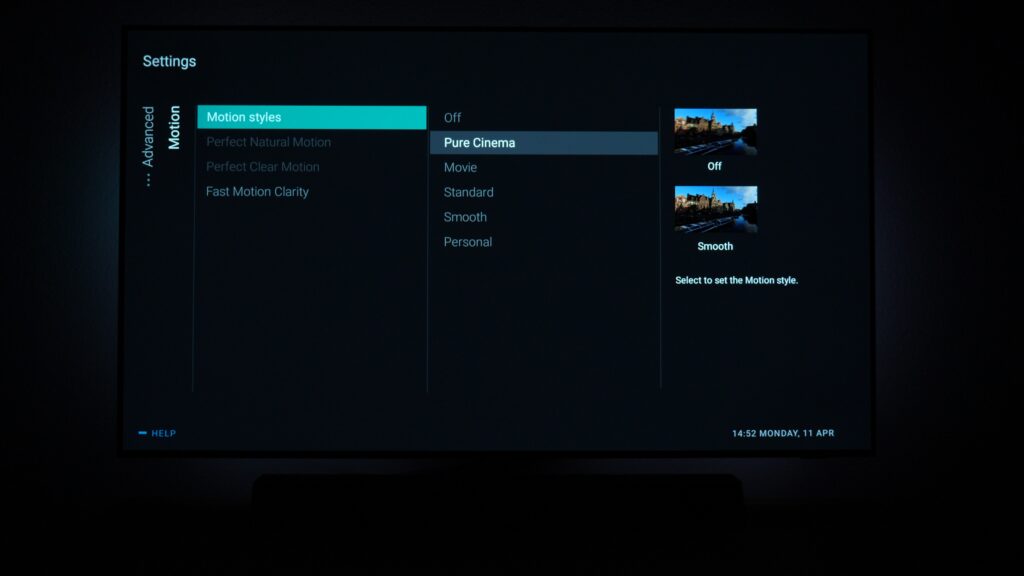
Motion
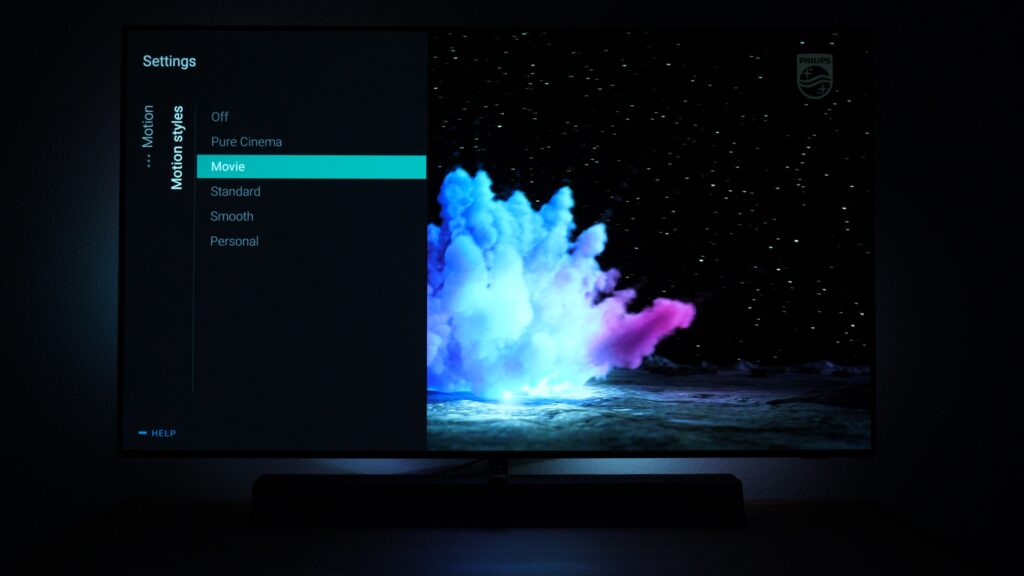
Depending on the image mode, the content is more or less affected by motion smoothing.
Ultimately, this function contributes significantly to the so-called motion handling and ensures smoother movements in scenes.
For this purpose, the TV – depending on the settings – continuously inserts more or less interlaced images into the displayed content.
The following settings can be selected:
- Off: No smoothing
- Movie: Gently smoothes scenes
- Pure cinema: Plays movies at 24 frames per second
- Standard: Stutter is reduced and sharpness increased
- Smooth: Playing content as smoothly as possible
- Personal: Choose your preferred setting individually
Perfect Clear Motion
This adjustment option helps you to display movements even more clearly on the panel of your Philips TV. At the same time, it also increases the black level. This function is most useful when there are a lot of fast movements on the TV screen.
Perfect Natural Motion
You can counteract so-called judder with this option in your Philips picture settings. This makes movements with fewer frames per second appear noticeably more natural.
Fast Motion Clarity
This function reduces blurring during fast camera movements. However, it can make the TV screen noticeably darker. After all, the so-called Black Frame Insertion is hidden behind this marketing term.
Colour
Colour enhancement
Use this option in your Philips picture settings to adjust the strength of the colors. Higher settings result in brighter and fuller coloring on your panel.
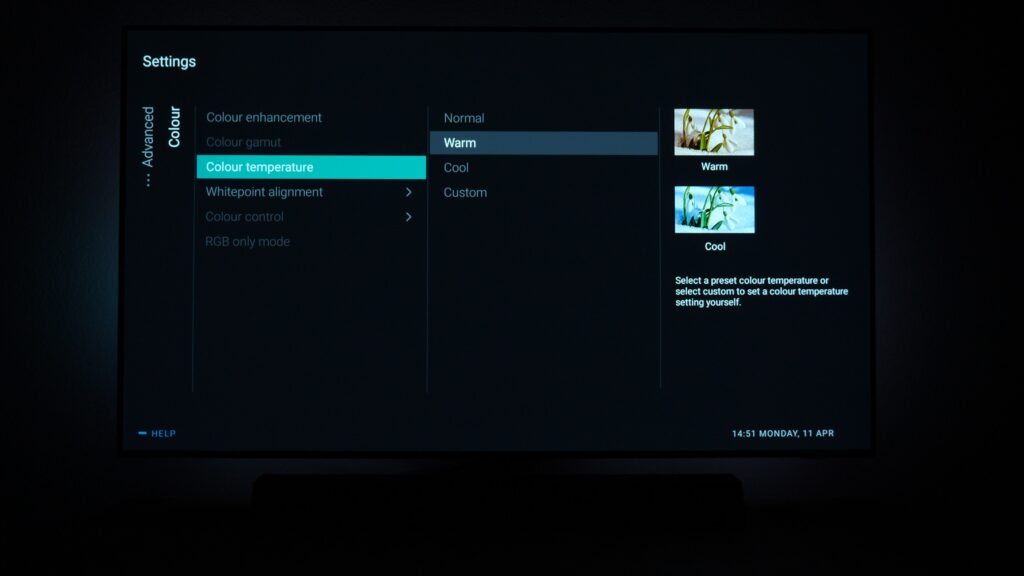
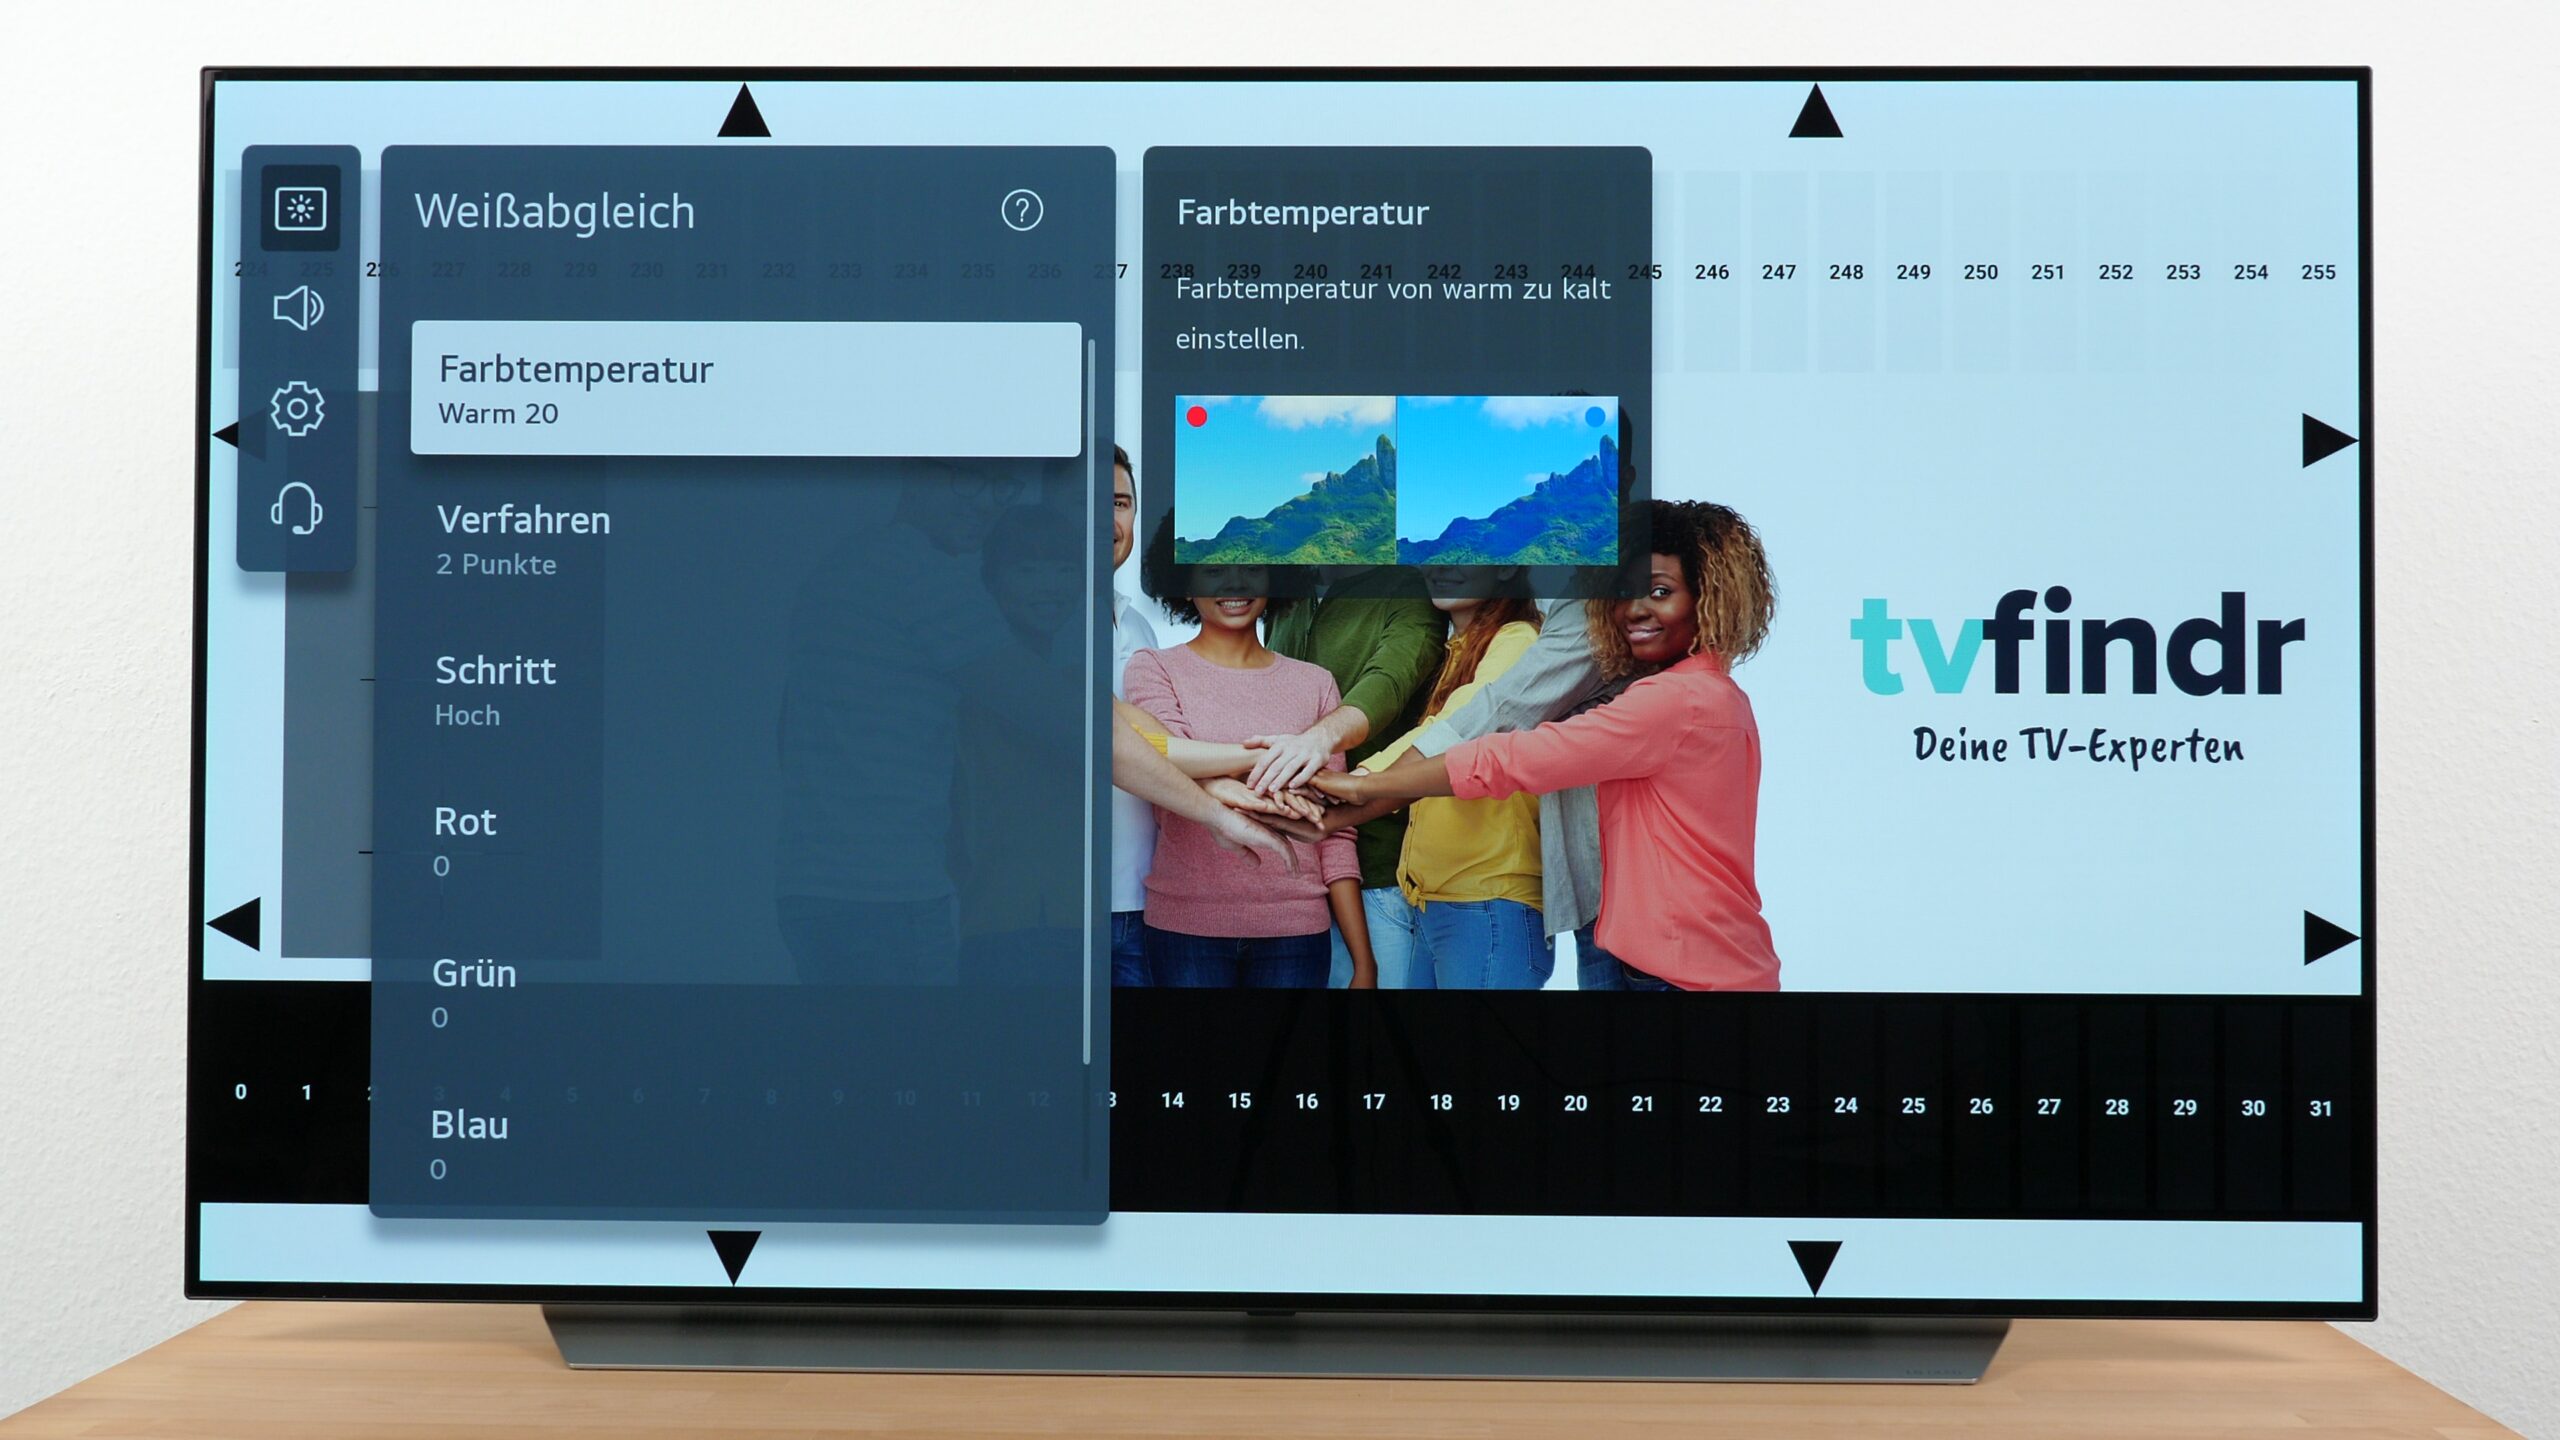
Colour temperature
This option controls the appearance of white areas on your panel. Several presets are available for this purpose.
The default setting already provides a relatively “cool” white tone on the screen. If you want to increase this display tone even further, select the “cold” option. This increases the amount of blue light on the screen.
This means an even “cooler”, bluish image. On the other hand, you have the option of making the white image much “warmer”. To do this, set the entry to “warm”. The image now has a yellowish tint. You can use the “personalized” option to make individual adjustments.
Colour gamut
This image optimizer artificially increases the so-called gamut for SDR content. This results in richer colors. However, this function does not affect the accuracy of the overall picture.
Colour control
To get more intense color results, you can separately saturate or attenuate the colors within this settings.
How to set the Philips picture settings correctly
But enough with the technical terms and on to the settings work. Reset your Philips TV to the factory settings so that all adjustments are as if you had just unpacked the TV. We have already done this with our test device. If you are also ready, we can immediately start with the actual calibration process.
The extensive settings menu in your Philips picture settings is somewhat hidden by design and is not necessarily considered particularly user-friendly.
Fortunately, you don’t have to navigate through the menu structure for too long. If you follow the procedure to the end, however, you won’t be able to avoid navigating through it several times.
To immediately access the more detailed picture settings, first press the menu button on your remote control and then select the “Common settings” section. Once there, scroll down until you have selected the “All settings” entry. Now you just have to confirm and finally select the „Picture” setting. Voila! You have just arrived at the Philips picture settings.
Philips picture settings: What is the best way to start?
Our first step is to switch to a better, so-called preset, since we want to achieve more color accuracy directly and also want a warmer color temperature. At this point, we choose the Filmmaker mode.
This preset is intended to reflect the filmmakers’ vision as accurately as possible, and for this reason it is an excellent setting foundation for what we will do next.
Unfortunately, this picture mode can also have a disadvantage. Depending on the Philips model, there is a risk that this setting will not bring the necessary brightness to your Philips panel for specific environmental light conditions. In short, you will realize that the overall picture is clearly too dark. If you also notice this problem, we recommend switching to the home theater mode as an alternative solution.
An additional, although expensive, variant is the expert or Calman mode. While this is actually the best solution, it also involves the most complex settings. This option only makes sense if you have expensive measuring devices, the right calibration software and know exactly what you are doing.
Now let’s get back to our preferred option, which is the mentioned Filmmaker mode. Once you’ve made the switch, you should notice that the image now looks yellowish overall. You don’t have to worry about that, though, as this preset is generally the best choice for representing the lighting conditions of many series and movies.
This is because light sources often have lower color temperatures in movies and series. As a result, you as the viewer will get the impression of warmer lighting.
Disable your AI features in your Philips picture settings
As mentioned, this image mode has good setting basics, which we will now build upon further by disabling many of the AI features as the next step. In case you’re wondering why we’re doing this? Many of these tools affect the image rendering.
It can therefore easily happen that your TV suddenly makes adjustments that unintentionally distort the picture quality. Our recommendation is therefore to try out the corresponding picture improvements only afterwards.
Which options are we talking about now? Well, you have to navigate from the image settings menu to the corresponding submenus via “Advanced”. First, we deactivate the noise reduction and artifact suppression from the “Sharp images” option.

Usually the activation of both options is not or no longer necessary. These filters are used to minimize possible noise during image rendering.
Downside of using it: This filter function can sometimes create quite ugly artifacts, which we then perceive as image errors. Apart from that, background noise is no longer a widespread problem nowadays.
The next step is to deactivate the “Ultra resolution” option. This prevents your Philips TV from automatically adjusting the sharpness depending on the displayed picture. If you have also made this adjustment, you can then deactivate the AI functions for the contrast.
Properly adjust the lighting conditions
After you have done this step as well, set the lighting conditions of the image to “Minimum”. Normally, we would recommend that you turn this function off completely as well.
However, our test device has one drawback: The OLED panel gets pretty dark by this. In combination with the Ambilight function, we do not find this to be a satisfying solution. If the panel is still too dim even with this setting, try to force a bit more brightness with the “Medium” option.
As an explanation: The dynamic adjustment of the light enhancement ensures a brighter display of the luminance levels. This will make your image brighter, but not more accurate.
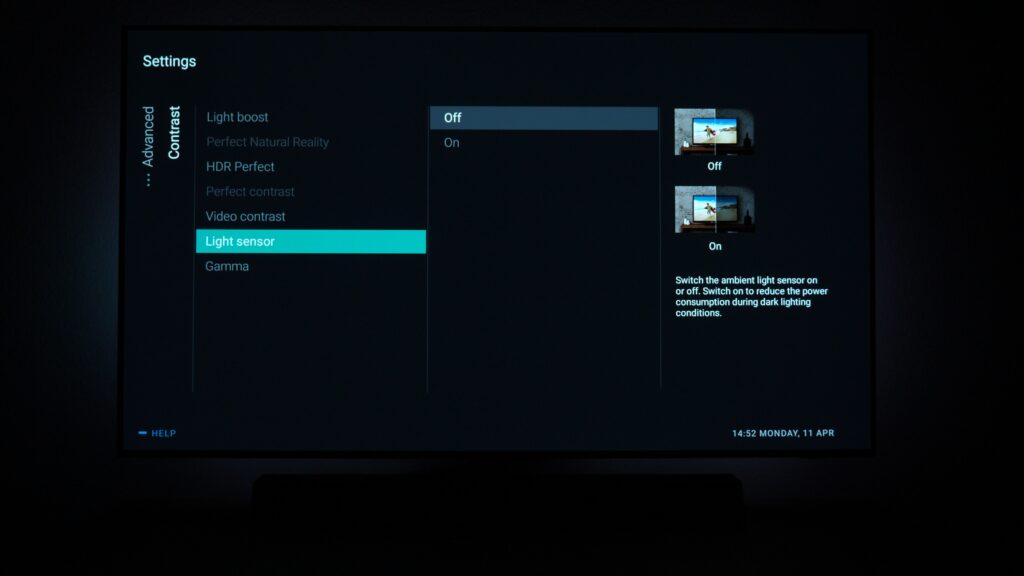
An additional menu feature that you can deactivate with a clear conscience is “Perfect Natural Reality” and “Perfect Contrast”. You can also deactivate the light sensor, since the function can be a hindrance for further settings.
The problem with this is that shadows can affect the sensor and cause a unintended dark display. If you use your Philips TV in different lighting conditions, you can consider reactivating this function after completing all Philips picture settings.
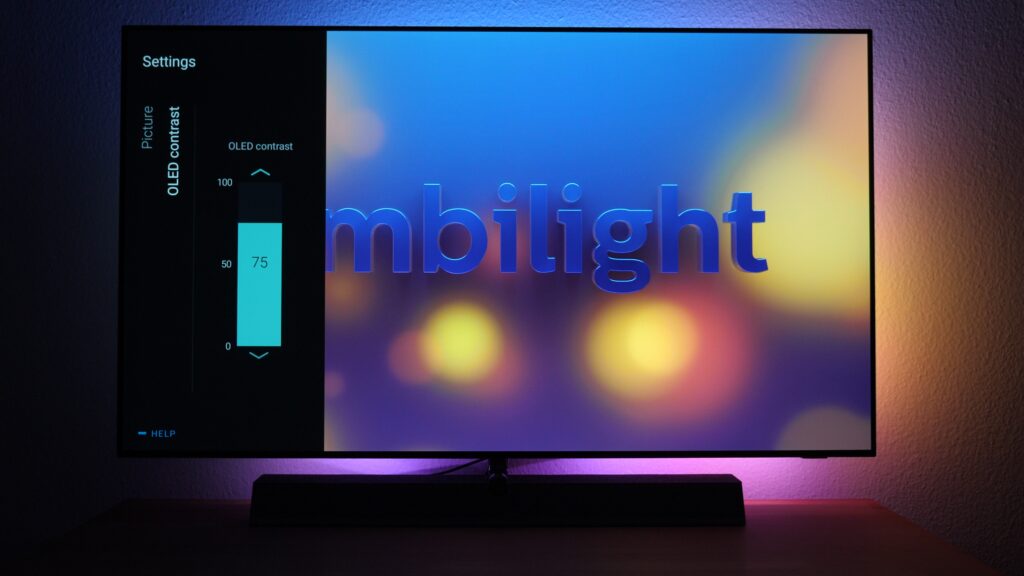
What you need to keep in mind when setting up the contrast
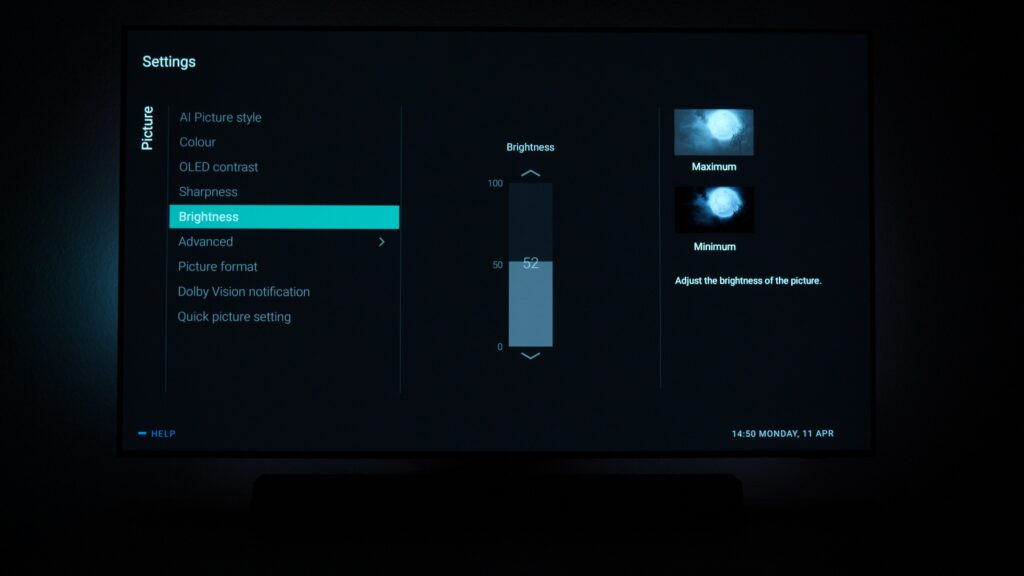
In order to be able to regulate the contrast properly, we first turned up the OLED panel to a value of 75 percent. Although we set our test device for the most accurate reproduction of SDR content in this part of the guide, this step seemed necessary to us because the display looked too dark otherwise. You should now be able to visually tell the difference between the individual brightness bars on our test screen.
We immediately noticed that there is no clear separation in the dark areas. To compensate for this impression, set the brightness value in your Philips picture settings to 52 points.
This setting on our test device ensures that we can still recognize This setting on our test device ensures that we can still recognize stage 253 as well as stage 3 from the surrounding levels. To get additional shadow details out of your panel, you can also try to make more precise adjustments yourself at this point. as well as level 3 from the surrounding levels. To get additional shadow details out of your panel, you can also try to make more precise adjustments yourself at this point.
Keep in mind that with OLED TVs you should focus on detail richness and an exact differentiation of the individual brightness steps to each other.
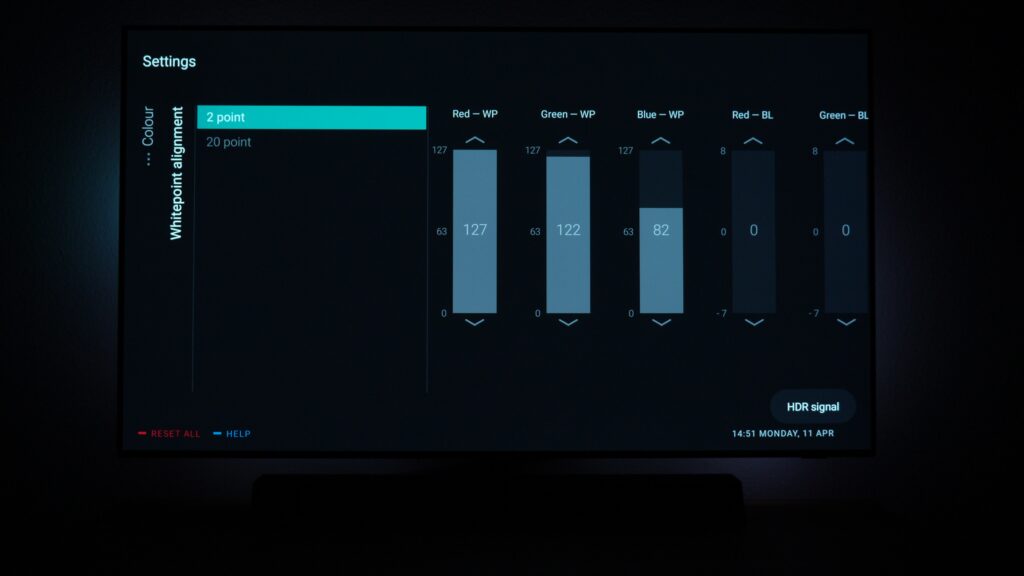
The color saturation in your Philips picture settings
Now that we are done with the preset adjustments, let’s go straight back to the general settings and take care of the “Color” option as the following step. Typically, you have to do little if anything in this area. We’ll now follow that principle again, since we would otherwise interfere with the color saturation.
Of course, you can still play around with the values. However, we do not recommend increasing the settings too much, as the naturalness of the image quickly suffers from excessive saturation. So use this option with caution.
As mentioned above, the Filmmaker mode has already done some of the color adjustment work for us and has already stored the “Warm” setting as a preset. With this option, we reduce the amount of blue in the picture on our Philips TV. As a result, we get an overall “warmer” and more natural picture impression.
Note: The Color Gamut option in the color menu of your Philips picture settings is a bit misleading, as this function is an image optimizer for SDR content to make colors more saturated and brighter on your panel. However, this effect is only added afterwards and does not come from the source material. So the image does not become more precise.
You should use the advanced function in this area if you are already familiar with it and have the appropriate equipment. If you are in doubt, you can consult an ISF expert who will make the settings for you.
First of all, this is associated with additional costs and, in our opinion, is only suitable if you have a TV from the upper price shelves and according picture performance.
How to adjust the sharpness
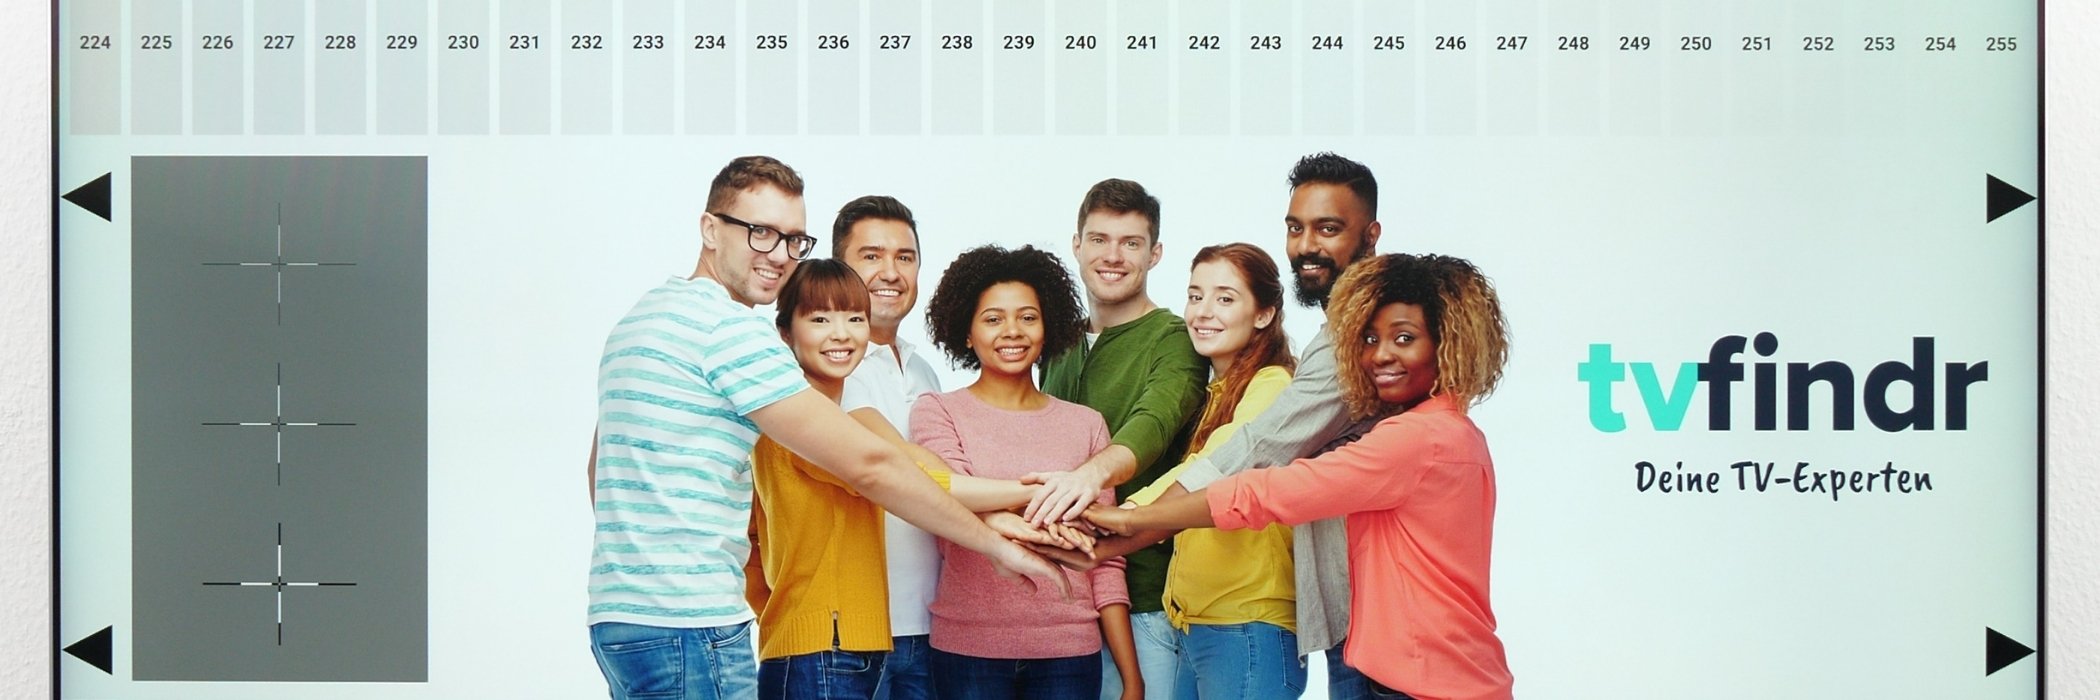
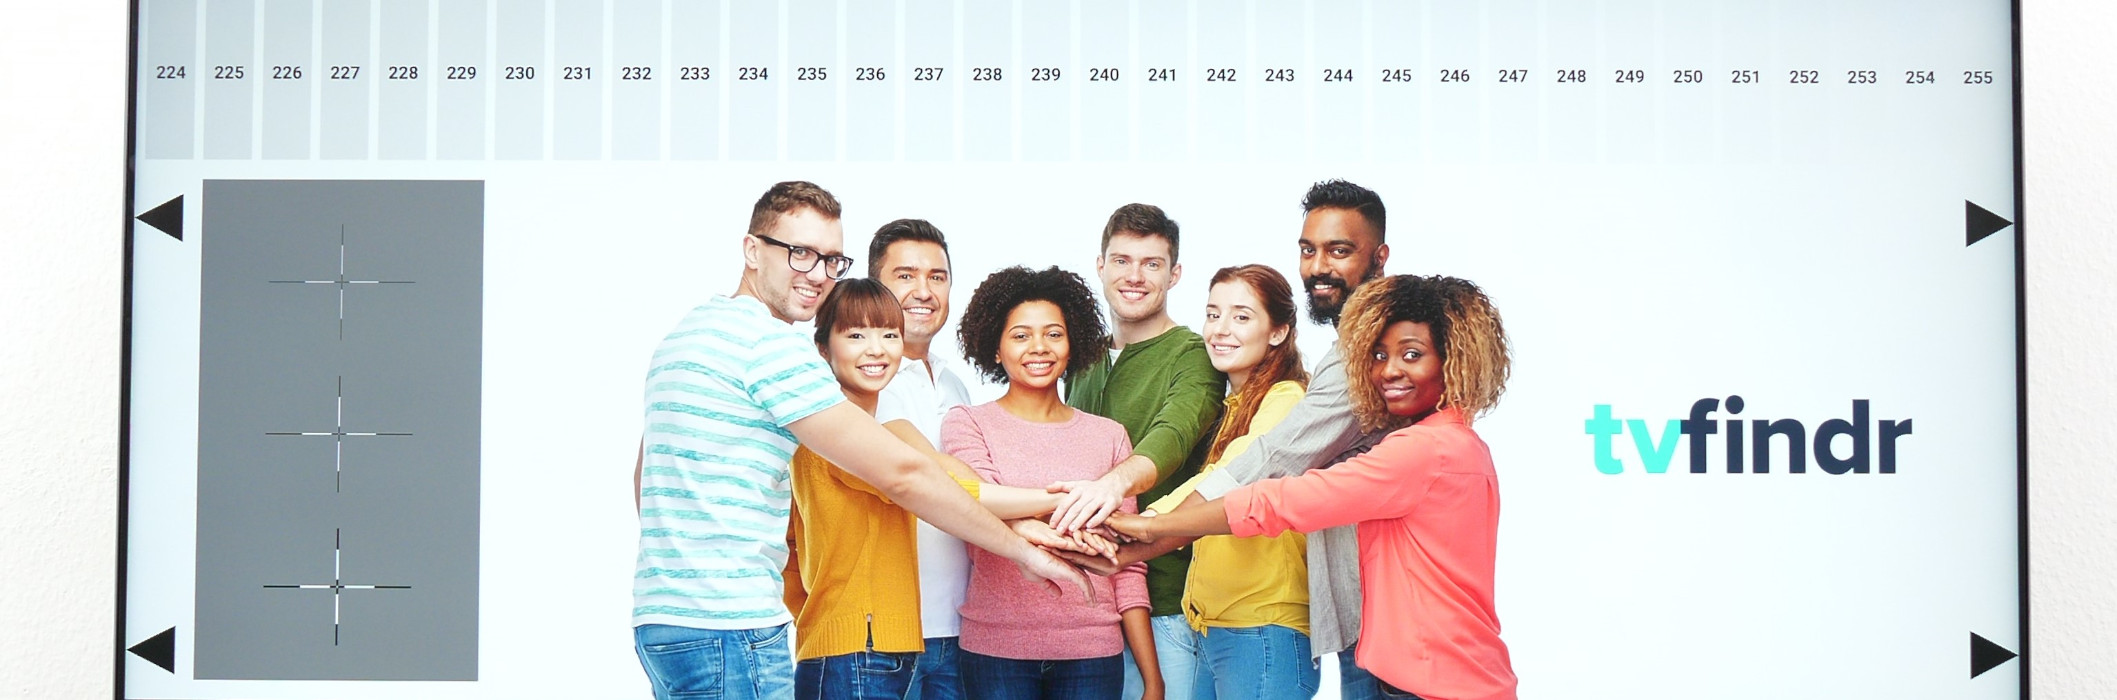
Let’s move on from the topic of coloring to sharpness. These are all the options that are related to the sharpening level. In order to set this area as optimally as possible, we will use our test image with the four crosses on the left and the group of people on the right.
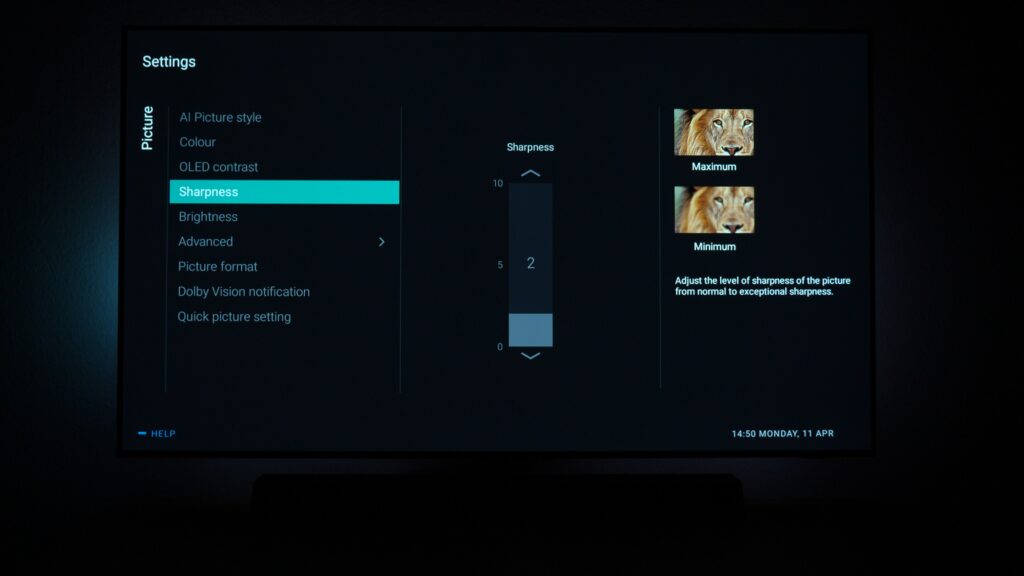
Important to understand: When adjusting the sharpness, the focus is on contours and edges. In relation to our test image, you therefore pay special attention to these detailed areas. First, set the sharpness to zero. Now increase the value so that you can clearly recognize the edges of all four crosses shown. We do not want to have any double contours.
The same also applies to the people and especially to their hair structure. Make sure the hair strands are clearly visible and can be recognized as clearly as possible. From our experience, you will be quickly facing the mentioned double contour problem.
Adjustments in luminance
If you are happy with the sharpness settings, we will now turn our attention to the brightness. For this, we will now go back to our snowy landscape and use this as a basis for some image tuning in detail.
This test pattern is perfect for adjusting the luminance in your Philips picture settings. First, we’ll take a look at the menu item “Video contrast” and continue our settings from this point. Even slight changes to this value will noticeably darken the overall picture. Therefore, we will leave this point untouched.
We will now continue with the gamma correction under the “Gamma” category. Since the Philips OLED+ 936’s panel is not extremely bright, we recommend setting this option to minus 1.
Note: If you move further into the minus range, the picture brightness increases. In the plus range, the display is respectively darker on your TV.
Which settings are hidden in the motion options?
This is another step that we’ll take pretty quickly. In terms of movement settings, select the “Pure cinema” level. This gets rid of the judder. The only thing you can’t avoid is the so-called stutter effect.
However, you can deactivate the “Fast Motion Clarity”. This Philips internal term is nothing else than the Black Frame Insertion feature. With the help of this tool, your Philips TV minimizes motion blur significantly.
However, this feature takes a big toll and visibly lowers the overall brightness of the TV. Our recommendation clearly favors the luminance and does not recommend activating this option. Motion blur is hardly a problem for OLEDs as a general rule anyway.
How to optimize your Philips TV for gaming
If you want to set up your TV specifically for gaming, we recommend activating the gaming mode as a preset from the start. This ensures that your TV works with the lowest possible input lag.
Usually, the Philips OLED+ 936 detects the input signal from PlayStation 5 or Xbox Series X and automatically switches to this preset. In our opinion, the picture already has a solid basic setting. Of course, you are still free to tweak the settings yourself according to these instructions.
Note: However, owners of an Xbox Series X will have to accept a limitation with the Philips OLED+ 936. The installed Twin Chipset of this model does not allow the simultaneous use of Ultra HD at 120 hertz of the Variable Refresh Rate and additionally Dolby Vision.
At this point, you only have the choice between improved picture quality or dynamic refresh rate. As soon as you include the increased dynamic range function, the TV lowers the frame rate from 120 to 60 frames per second.
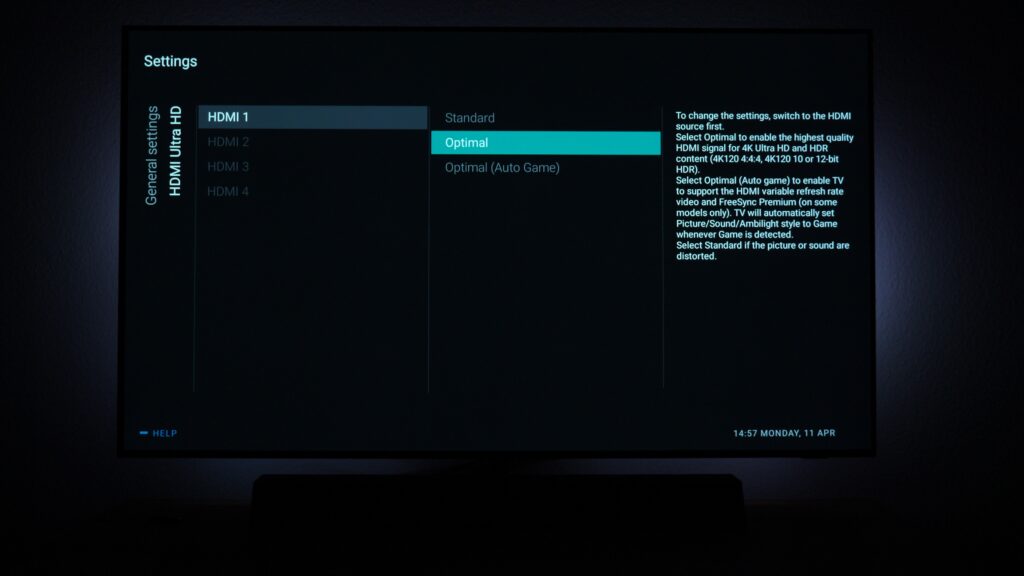
And this is how you select the respective option:
Press the gear icon on your remote and navigate to “Common Settings”.
From there, continue via “All settings” and “General settings”. Finally, you will find the entry “HDMI Ultra HD”. This is where you can see the individual HDMI ports. Select the port that your Xbox Series X is connected with.
Be careful to use either the HDMI 1 or HDMI 2 port on the back, as the HDMI ports on the side do not support 4K at 120 hertz. Now you are offered two options to choose from.
The “Optimal” variant offers the best picture settings, but has a relatively high input lag. In comparison, the option “Optimal (automatic gaming mode)” offers VRR and a low input lag.
Philips picture settings and High Dynamic Range
Let’s now look at the quite clear range of settings in the HDR section. As with the gaming mode, our review device automatically switches to HDR mode when a corresponding signal is received.
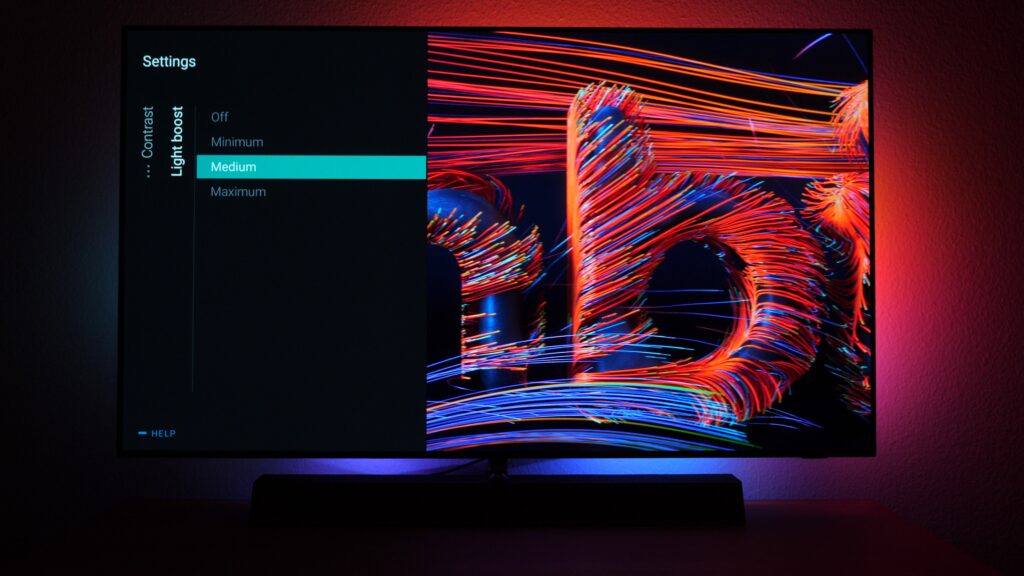
Once your TV has done that, you can now set the OLED contrast to 100 percent and set the light boost to the highest or, alternatively, the medium level, depending on the quality of the content. This way, highlights are better accentuated.
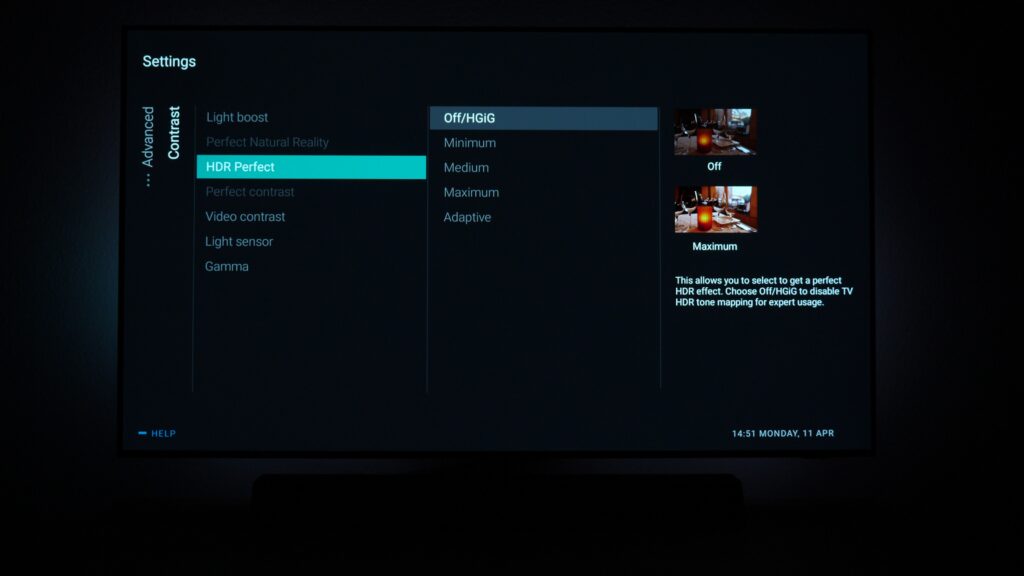
Any additional settings we made earlier for the SDR area will remain unaffected, as your TV will automatically switch to a different color space for High Dynamic Range content. You can now make additional adjustments to the brightness curve via the “HDR Perfect” menu item if you like. At this point, we recommend either using the HGiG option or turning this feature off. Otherwise, HDR content might look rather unnatural.
FAQ – Frequently asked questions about Philips picture settings
Where can I find the picture settings in your Philips TV?
You can access the picture settings of your Philips TV via the gear icon on your remote control. There are several entries available via the “Picture” tab. This includes the item “AI picture settings” with the preset picture modes and all other important parameters.
Which picture mode is best for Philips TVs?
In order to be as close as possible to the creative intention of a series or a film, we recommend that you select the so-called “Filmmaker Mode” in the AI image settings.
Where exactly can I dim Ambilight?
Your remote control also has a dedicated button for this. As soon as you press it, the Ambilight menu opens and you can adjust the backlight according to different criteria. For example, you can determine how fast the LEDs react to the TV picture or how bright the effect should be overall.
How do I enable HDR on my Philips TV?
On Philips TVs, the function is somewhat veiled and hidden in the “General Settings” beneath the term “HDMI Ultra HD“. There you can activate HDR – depending on the model – for more or less HDMI ports in your Philips picture settings.

tvfindr Editorial
As a studied technology journalist Tobi likes to write regularly about the colorful world of TV sets & Co. Further interests: Music, cars, gaming, soccer